Mermaid Tile Bathroom: Transform Your Space with Ocean-Inspired Design (2026 Guide)
Introduction:
Picture this: You step into your bathroom and feel like you’ve just walked into an underwater paradise. The tiles shimmer like scales catching sunlight through ocean waves. That’s the magic of a mermaid tile bathroom.
I’ll be honest with you – when I first heard about mermaid tiles, I thought it was just another passing trend. But here’s where it gets interesting: this design style has transformed from a quirky idea into one of the most sought-after bathroom aesthetics of 2026. And there’s a good reason why.
Mermaid tile bathrooms combine the calming essence of coastal living with the practical durability you need in a wet space. Whether you’re planning a complete renovation or just want to add some oceanic charm to your existing bathroom, this guide will walk you through everything you need to know.
You might be wondering if this style works for your home. The beauty of mermaid bathroom tiles is their versatility – they fit beautifully in modern apartments, traditional homes, and everything in between. Let’s dive in and explore how you can create your own underwater sanctuary.
What Are Mermaid Tiles and Why They’re Perfect for Bathrooms
So what exactly makes a tile a “mermaid tile”? It’s not as complicated as you might think.
Mermaid tiles are ceramic, porcelain, or glass tiles designed to mimic the iridescent, scale-like patterns you’d imagine on a mermaid’s tail. They typically feature fish scale shapes (also called scallop tiles or fan-shaped tiles), holographic finishes, or ocean-inspired color gradients that shift and shimmer in different lighting.
What I love about this style is how it captures that magical underwater feeling without being over-the-top. You don’t need to commit to a full Little Mermaid theme – though you absolutely can if that’s your vibe! Most mermaid tile bathroom designs strike a sophisticated balance between whimsy and elegance.
The Distinctive Features of Mermaid Bathroom Tiles
Here’s what sets these tiles apart from your standard subway or square tiles:
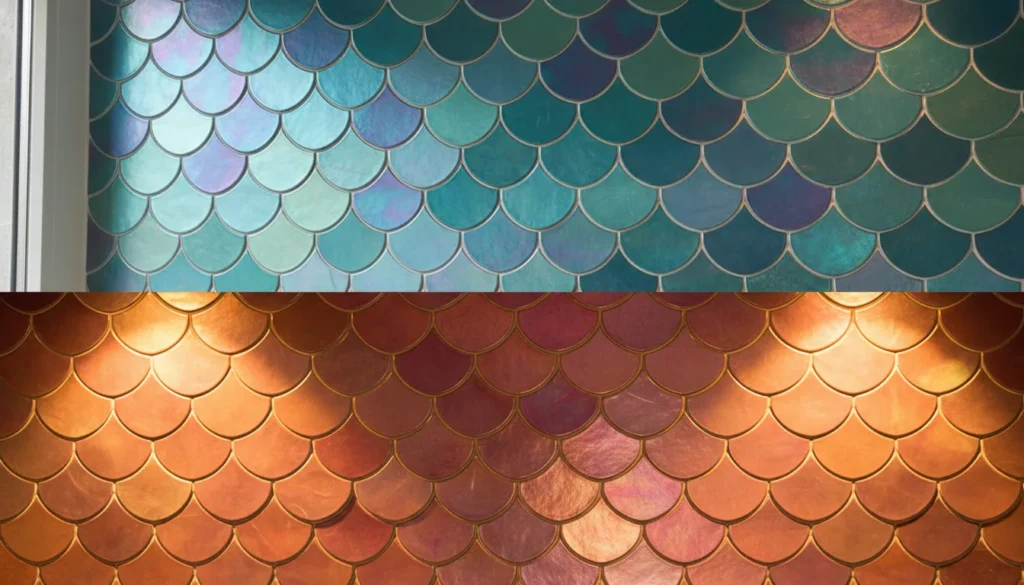
Iridescent and holographic finishes reflect light in ways that create depth and movement. Walk past your bathroom wall at different times of day, and you’ll notice the colors shift from turquoise to purple to silver. It’s like having a living art installation in your home.
Fish scale tile patterns (technically called Moroccan fish scale tiles) create that iconic mermaid tail look. These overlapping scalloped shapes add texture and visual interest that flat tiles simply can’t match.
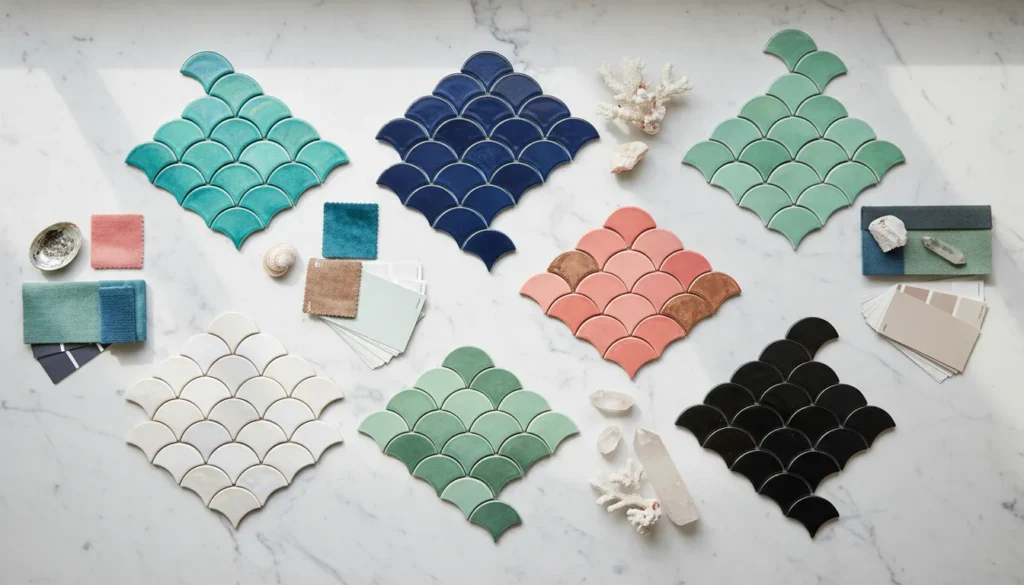
The color palette typically includes ocean-inspired hues: aqua blues, seafoam greens, pearl whites, coral pinks, and deep navy tones. But modern interpretations also embrace rose gold, copper, and even black for a more dramatic effect.
Now here’s where it gets interesting – you don’t have to tile every surface. Many homeowners use mermaid tiles as an accent wall or shower feature, pairing them with complementary neutral tiles for balance. This approach saves money while still creating that wow factor.
Why Bathrooms Are the Ideal Space for Mermaid Tiles
Bathrooms naturally connect with water, making them the perfect canvas for oceanic themes. The practical benefits matter too.
Mermaid bathroom tiles are typically made from glazed ceramic tile, porcelain, or glass – all materials that handle moisture exceptionally well. You won’t find yourself dealing with water damage or mold issues if they’re properly installed.
The glossy, glazed finishes common in mermaid tile designs are also incredibly easy to clean. A quick wipe-down keeps them looking pristine, which is essential in a high-humidity environment like your bathroom.
In my experience, these tiles also hide water spots better than plain white tiles. The varied colors and reflective surfaces camouflage those annoying hard water marks that show up so clearly on solid-colored tiles.
Popular Mermaid Tile Bathroom Design Styles and Color Schemes
The versatility of mermaid tile bathrooms means you can adapt them to virtually any design aesthetic. Let me walk you through the most popular approaches.
Classic Coastal Mermaid Bathroom
This is probably what first comes to mind when you think of mermaid tiles. The classic coastal approach embraces soft blues, aquas, and white tones that evoke peaceful beach mornings.
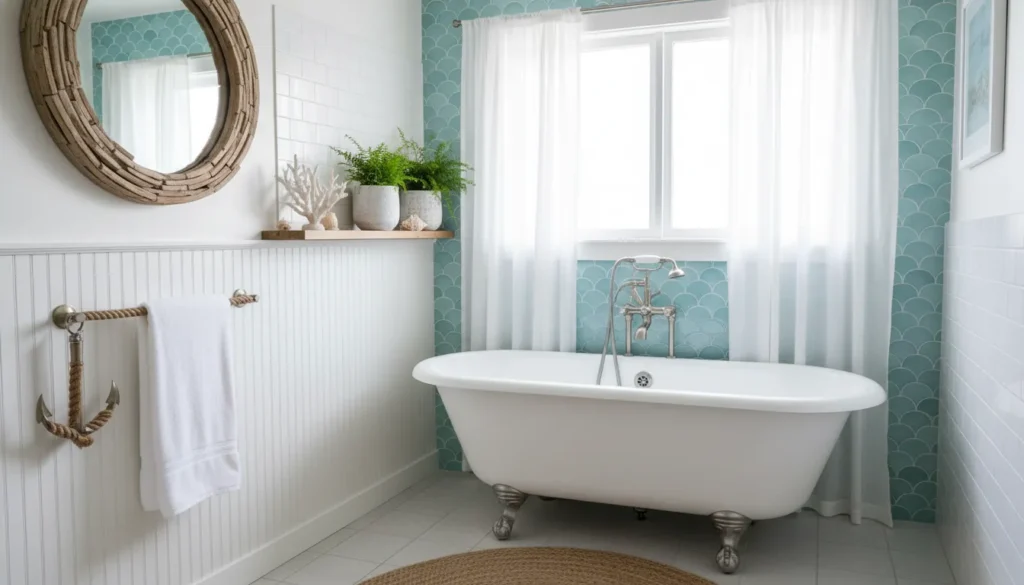
For this style, consider using blue-green gradient fish scale tiles on your shower wall, paired with white subway tiles on the remaining walls. Add natural wood elements, rope-wrapped mirrors, and brass fixtures that suggest weathered ship hardware.
What makes this work so well is the color psychology. Blue tones are proven to reduce stress and promote relaxation – exactly what you want in a bathroom sanctuary. The coastal mermaid bathroom tile approach feels both refreshing and timeless.
Glamorous and Luxurious Mermaid Design
Now, if you’re after something more dramatic, the glamorous route might be your calling.
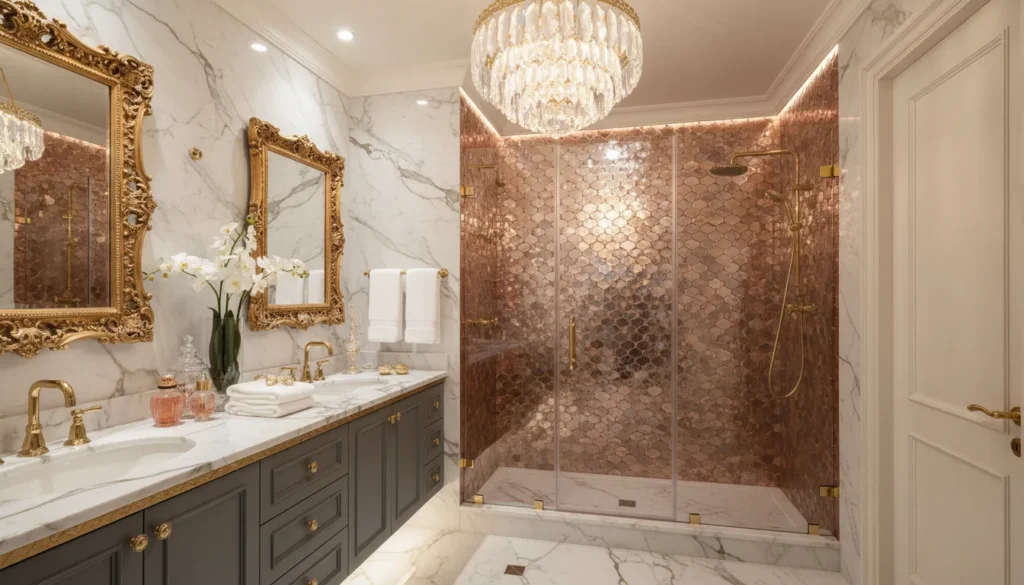
Think rose gold or copper mermaid tiles with metallic finishes, paired with marble countertops and gold fixtures. This combination creates a bathroom that feels like a high-end spa.
I’ve seen stunning installations where rose gold fish scale tiles cover the entire shower enclosure, reflecting light in the most beautiful way. Add some pendant lighting with crystal elements, and you’ve got yourself a genuinely luxurious space.
The key here is balance. You don’t want it to feel too heavy or overwhelming, so consider using the mermaid tiles as your statement piece and keeping other elements relatively simple.
Modern Minimalist Mermaid Bathroom
You might be wondering if mermaid tiles can work in a minimalist space. Absolutely.
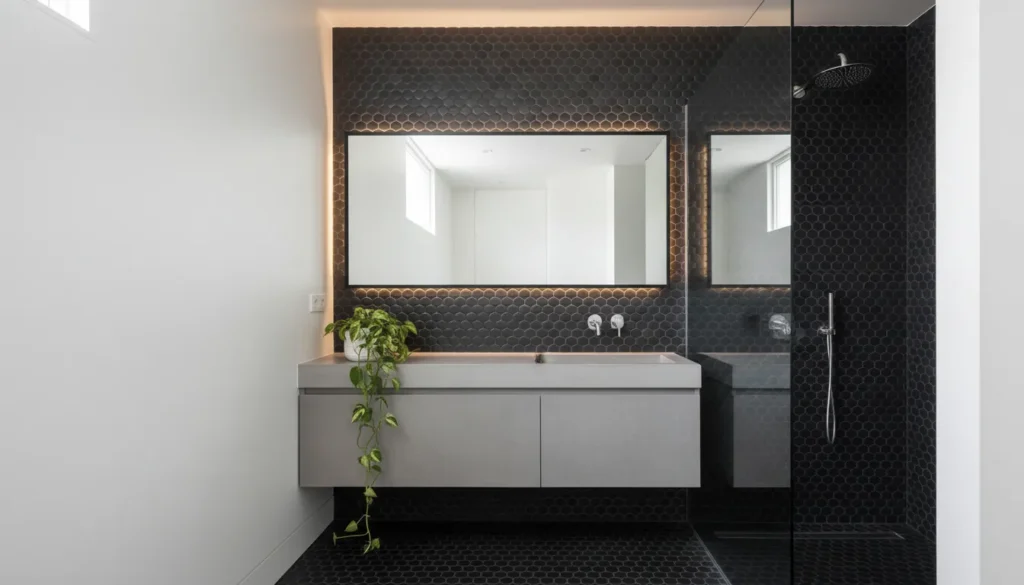
For a modern minimalist approach, choose mermaid bathroom tiles in a single color – perhaps matte black, charcoal gray, or pure white fish scale tiles. The pattern itself provides visual interest without needing color variation.
Pair these with clean lines, floating vanities, frameless glass shower doors, and minimal hardware. The result feels contemporary and sophisticated while still capturing that underwater essence through pattern and texture.
Tropical and Bold Mermaid Tile Combinations
For those who love color and aren’t afraid to show it, tropical mermaid tile bathroom designs bring serious personality.
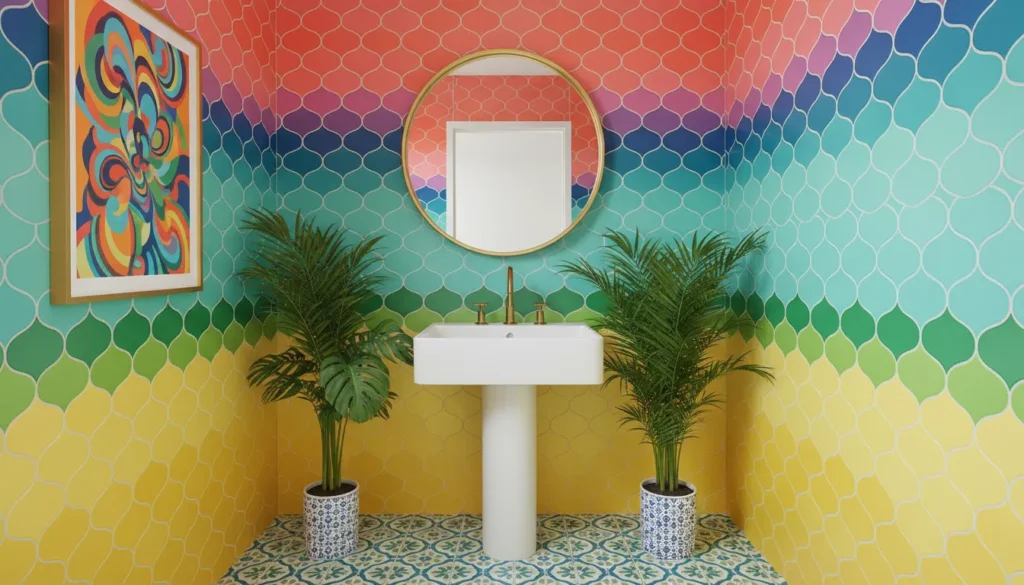
Mix coral pink, turquoise, yellow, and lime green mermaid tiles in a gradient or ombre pattern. This works especially well in powder rooms or guest bathrooms where you can be more adventurous without affecting your daily routine.
Add tropical plants like monstera or bird of paradise, bamboo accents, and vibrant artwork to complete the look. It’s like having a permanent vacation spot right in your home.
Choosing the Right Mermaid Tiles for Your Bathroom Project
Here’s where the rubber meets the road. You’ve fallen in love with the idea of mermaid tiles, but now you need to make practical decisions.
Material Options: Ceramic, Porcelain, and Glass
The material you choose affects everything from cost to maintenance to longevity.
Ceramic mermaid tiles are the most affordable option and work well for walls. They’re lighter than porcelain, making them easier to install, especially for DIY projects. However, they’re more porous than porcelain, so they’re not ideal for shower floors where standing water occurs.
Porcelain mermaid bathroom tiles cost more but offer superior durability and water resistance. They’re denser than ceramic, making them suitable for both walls and floors. If you’re tiling a shower floor or a high-traffic bathroom, porcelain is worth the investment.
Glass mermaid tiles create the most dramatic iridescent effects. Light passes through them in magical ways. But they’re the most expensive option and require professional installation. Glass tiles also show water spots more easily, meaning more frequent cleaning.
In my experience, most homeowners go with porcelain for the best balance of beauty, durability, and cost.
Size and Shape Considerations
Mermaid tiles come in various sizes, typically ranging from small 1-inch mosaics to larger 4-inch scales.
Smaller tiles create a more intricate, detailed look with more grout lines. This works beautifully for accent walls or niches but requires more time and skill to install. The increased grout lines also mean more maintenance over time.
Larger fish scale tiles make a bold statement with fewer grout lines, creating a cleaner look that’s easier to maintain. They’re also faster to install, which can reduce labor costs if you’re hiring professionals.
The shape matters too. Traditional mermaid bathroom tiles feature the classic fish scale or scallop shape, but you’ll also find hexagonal honeycomb patterns, elongated fan shapes, and irregular organic shapes that all capture that oceanic feel.
Finish Types: Glossy, Matte, and Iridescent
The finish dramatically affects the final look of your mermaid tile bathroom.
Glossy finishes are the most popular for mermaid tiles because they reflect light beautifully, creating that shimmery, wet look that evokes water. They’re also easiest to clean since dirt and soap scum don’t cling to the smooth surface.
Matte finishes offer a more subtle, contemporary take on the mermaid theme. They won’t show water spots as clearly and create a softer, more understated look. However, they can be slightly harder to clean since the textured surface provides more places for soap buildup.
Iridescent or holographic finishes are where mermaid tiles really shine – literally. These special glazes contain materials that split light into rainbow colors, creating that magical underwater sparkle. They cost more but deliver maximum impact.
Step-by-Step Guide to Installing Mermaid Tiles in Your Bathroom
Ready to tackle installation? Whether you’re going DIY or hiring professionals, understanding the process helps ensure great results.
Planning and Measuring Your Space
Before you buy a single tile, you need accurate measurements.
Measure the wall area you plan to tile, calculating square footage by multiplying height by width. Add 10-15% extra for cuts, breakage, and future repairs. Mermaid tiles with unique shapes often generate more waste than standard rectangular tiles, so don’t skimp on the overage.
Create a layout plan. For fish scale mermaid bathroom tiles, you’ll want to center the pattern on your focal wall. Start from the center and work outward to avoid awkward partial tiles at the edges.
Consider where your pattern will end. Fish scale tiles look best when rows are completed, so adjust your starting point to avoid cutting through scales at the top or bottom of your installation.
Required Tools and Materials
Here’s what you’ll need for a successful mermaid tile installation:
- Tile adhesive (thin-set mortar for heavy tiles, mastic for lighter ceramic)
- Grout (epoxy grout is best for wet areas)
- Tile spacers
- Notched trowel (size depends on tile size)
- Tile cutter or wet saw
- Level and measuring tape
- Grout float and sponge
- Sealant for grout lines
For fish scale tiles specifically, you might want a tile template or mesh-backed sheets that hold the pattern in place. These make installation much easier, especially for beginners.
Installation Process for Fish Scale Mermaid Tiles
Now here’s where it gets hands-on. Let me walk you through the basic process.
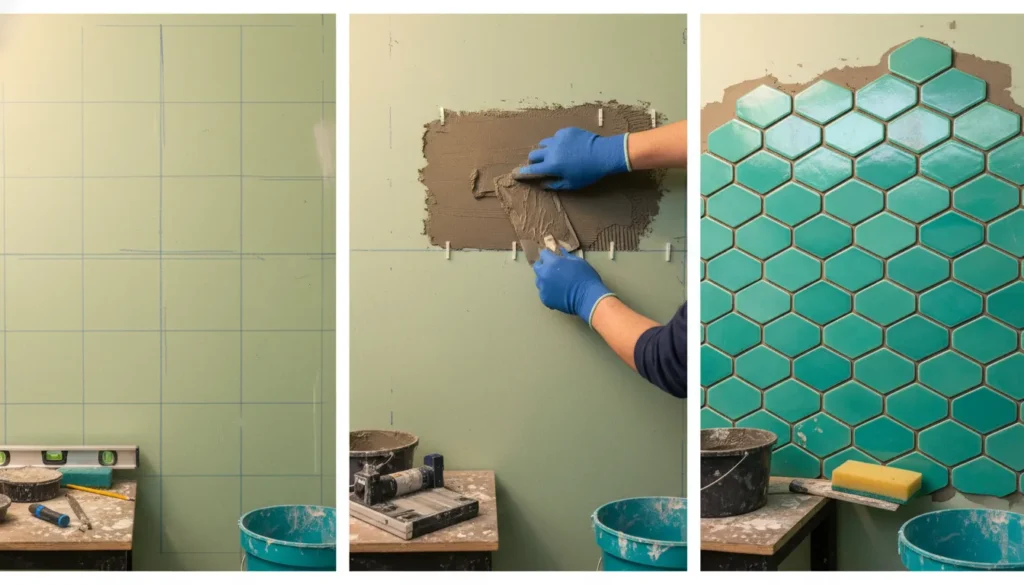
Step 1: Prepare the Surface Your wall must be clean, dry, and flat. Remove old tiles if necessary. Apply cement backer board in shower areas for proper water resistance. Prime the surface if required by your adhesive manufacturer.
Step 2: Apply Adhesive Using your notched trowel, spread tile adhesive on the wall in small sections (about 3-4 square feet). Work in areas you can tile within 15-20 minutes before the adhesive starts to skin over.
Step 3: Place the Tiles If using mesh-backed mermaid tile sheets, press them firmly into the adhesive, ensuring full contact. For individual tiles, place each scale carefully, maintaining consistent spacing. The overlapping pattern of fish scales means each row offsets from the one below it – think of roof shingles.
Step 4: Level and Space Use your level frequently to ensure rows stay straight. Use spacers between tiles to maintain consistent grout lines. With fish scale tiles, spacers go at the bottom of each scale where it overlaps the row below.
Step 5: Let It Set Allow the adhesive to cure completely – usually 24-48 hours – before grouting. Don’t rush this step.
Step 6: Grout the Tiles Mix your grout according to package directions. Using a grout float, work the grout into all joints at a 45-degree angle. Remove excess by dragging the float diagonally across tiles.
Step 7: Clean and Seal After 15-20 minutes, wipe the tile surface with a damp sponge to remove grout haze. Once the grout has fully cured (check manufacturer recommendations), apply a grout sealer to protect against water and staining.
Professional Installation vs. DIY
You’re probably wondering whether to hire a pro or DIY your mermaid tile bathroom.
DIY installation makes sense if you have tiling experience and are working on a small area like an accent wall or backsplash. You’ll save on labor costs, which typically run $5-15 per square foot on top of materials.
Professional installation is worth considering for:
- Large areas like entire shower enclosures
- Tricky layouts with lots of angles and cuts
- Expensive tiles where mistakes cost significant money
- Situations where you need waterproofing guarantees
Professional tile installers have the experience to handle the unique challenges of fish scale patterns, ensuring your mermaid tiles line up perfectly and are properly sealed against water intrusion.
Cost Breakdown for a Mermaid Tile Bathroom
Let’s talk money. Understanding the costs helps you budget appropriately and make informed choices.
Tile Costs by Material and Quality
Mermaid bathroom tile prices vary significantly based on material, quality, and finish.
| Tile Material | Price Range per Square Foot | Best For |
|---|---|---|
| Ceramic Mermaid Tiles | $3-$12 | Budget-friendly wall installations |
| Porcelain Mermaid Tiles | $8-$25 | High-traffic areas, shower floors |
| Glass Mermaid Tiles | $15-$40 | Accent walls, luxury installations |
| Natural Stone (like pearl shell) | $25-$60+ | High-end, unique applications |
Budget-conscious homeowners can create beautiful mermaid tile bathrooms by using less expensive ceramic tiles as the main material and adding a single row or accent area of pricier glass tiles for sparkle.
Installation and Labor Expenses
If you’re hiring professionals, labor typically costs as much or more than the tiles themselves.
Expect to pay $5-15 per square foot for professional installation of mermaid tiles. The wide range reflects factors like your location, project complexity, and whether additional work like waterproofing or backer board installation is needed.
Fish scale tiles generally cost more to install than standard rectangular tiles because the pattern requires more precision and the unusual shape means more cuts and adjustments.
For a typical bathroom shower surround (about 80 square feet), you’re looking at $400-1,200 in labor costs alone.
Budget-Friendly Ways to Achieve the Mermaid Look
You don’t need to spend thousands to get the mermaid tile bathroom of your dreams.
Consider these cost-saving strategies:
Start with an accent wall instead of tiling the entire bathroom. A single shower wall featuring mermaid tiles creates major impact at a fraction of the cost of a full installation.
Mix and match expensive iridescent tiles with affordable plain tiles. Use mermaid tiles in a border, niche, or as a horizontal band around the room.
Choose ceramic over porcelain or glass. While not as durable, ceramic mermaid bathroom tiles still look beautiful on walls where they won’t experience foot traffic.
DIY the installation if you have basic handyman skills. You’ll save significantly on labor, though I recommend starting with a small project to build confidence.
Look for sales and discontinued patterns. Tile stores often deeply discount discontinued styles. If you find tiles you love at 50% off, buy extra for future repairs.
Complementary Design Elements for Your Mermaid Bathroom
Mermaid tiles are your star, but supporting design elements complete the look.
Coordinating Fixtures and Hardware
The right fixtures enhance your mermaid tile bathroom without competing for attention.
Brushed nickel and polished chrome fixtures work beautifully with cool-toned mermaid tiles in blues and greens. These metals have a silvery quality that echoes the iridescent shimmer of the tiles.
For warmer mermaid tiles in coral, pink, or rose gold, consider brass, copper, or gold fixtures. These create a luxurious, cohesive look.
Keep fixture designs relatively simple. Since mermaid tiles already provide significant visual interest, ornate fixtures can make the space feel cluttered. Clean-lined contemporary or transitional styles typically work best.
Lighting to Enhance Tile Shimmer
Here’s a secret: the right lighting makes your mermaid bathroom tiles look dramatically more impressive.
Recessed lighting or LED strip lights positioned to graze across the tile surface emphasize the texture and pattern of fish scales. Light hitting at an angle creates shadows that make the scales pop.
Adjustable fixtures let you highlight your tiles at different times. Wall sconces on dimmer switches let you create different moods from bright and functional to soft and spa-like.
For maximum shimmer with iridescent mermaid tiles, consider color-changing LED lights that can shift through the spectrum. This might sound gimmicky, but I’ve seen it done tastefully in high-end spa bathrooms.
Natural light is also your friend. If your bathroom has a window, position your mermaid tile feature where it catches daylight. Morning sun on iridescent tiles is genuinely magical.
Coordinating Accessories and Decor
Complete your mermaid tile bathroom with thoughtful accessories.
Mirrors are essential. Choose frames that complement your style – driftwood for coastal, brass for glamorous, or frameless for modern minimalist.
Textiles in coordinating colors tie everything together. Choose towels, bath mats, and shower curtains in ocean-inspired hues that echo your mermaid tiles without exactly matching.
Natural elements like coral, shells, sea glass, or driftwood work perfectly without being too literal. A simple glass jar filled with collected shells sits nicely on a vanity.
Plants bring life to the space. Bathrooms naturally have humidity that many plants love. Consider pothos, ferns, or orchids that thrive in these conditions.
Maintenance and Care for Mermaid Tile Bathrooms
Your beautiful mermaid tile bathroom will last decades with proper care.
Daily and Weekly Cleaning Routines
Keep your mermaid bathroom tiles sparkling with simple regular maintenance.
Daily: After showering, squeegee or wipe down tile surfaces. This simple step prevents soap scum buildup and hard water deposits that dull the finish of your mermaid tiles.
Weekly: Clean tiles with a pH-neutral tile cleaner and soft cloth or sponge. Avoid abrasive scrubbers that can scratch glossy finishes. For iridescent mermaid tiles, specialized glass cleaner works beautifully.
Pay special attention to grout lines. A soft brush with mild cleaner keeps grout looking fresh. Clean grout enhances the beauty of your mermaid tiles by creating crisp definition between scales.
Preventing Water Damage and Staining
Proper prevention beats difficult repairs every time.
Seal grout lines every 1-2 years. Grout is porous and can absorb water, leading to mold or mildew. A quality grout sealer creates a protective barrier.
Ventilate properly. Run your exhaust fan during showers and for 20-30 minutes after. Good ventilation prevents excess humidity that can lead to mold growth behind tiles.
Address leaks immediately. If you notice loose tiles or grout cracking, repair it quickly. Water infiltration behind tiles causes serious damage over time.
Long-Term Care and Restoration
With proper care, your mermaid tile bathroom remains beautiful for decades.
Regrouting may be necessary every 10-15 years as grout naturally deteriorates. This refreshes the entire look of your mermaid tiles without replacing them.
Professional cleaning every few years removes buildup that regular cleaning misses. Professional tile cleaners have specialized equipment and products that restore the original luster of mermaid bathroom tiles.
If individual tiles crack or break, it’s worth keeping extra tiles from your original installation. Replacing a damaged tile maintains the seamless look of your mermaid tile installation.
Common Mistakes to Avoid with Mermaid Tile Bathrooms
Learn from others’ mistakes so you don’t repeat them.
Design Mistakes That Reduce Visual Impact
Using too many patterns is the most common error. When you combine mermaid tiles with busy wallpaper, patterned flooring, and ornate fixtures, nothing stands out. Let your mermaid bathroom tiles be the star by keeping other elements simpler.
Wrong scale for the space matters too. Large fish scale tiles in a tiny powder room can overwhelm, while tiny mosaics in a spacious bathroom may look underwhelming. Match tile scale to room size.
Ignoring the grout color is a missed opportunity. Grout color dramatically affects the final look. Dark grout creates strong definition between scales, while matching grout color creates a seamless, subtle effect. Consider your goal before choosing.
Installation Errors to Watch For
Improper waterproofing causes the most serious problems. Bathrooms need proper moisture barriers behind tiles. Cutting corners here leads to water damage, mold, and eventually failed tiles. Use cement backer board and waterproofing membrane in wet areas.
Inconsistent spacing between tiles looks unprofessional. Fish scale mermaid tiles require careful attention to maintain the pattern. Using spacers and frequently checking your work prevents this issue.
Rushing the process leads to problems. Adhesive needs proper curing time before grouting. Grout needs curing time before use. Follow manufacturer recommendations even if it means waiting longer.
Choosing Incompatible Materials
Not all tiles work in all locations. Glass mermaid tiles shouldn’t go on shower floors – they’re too slippery. Some ceramic tiles aren’t rated for wet areas. Always check that your chosen mermaid bathroom tiles are appropriate for your specific application.
Similarly, ensure your adhesive and grout are compatible with your tiles and suitable for wet environments. Using the wrong products voids warranties and leads to premature failure.
Real-World Inspiration: Mermaid Tile Bathroom Examples
Let’s look at how others have successfully incorporated mermaid tiles into their homes.
Small Bathroom Transformations
You might be wondering if mermaid tiles work in compact spaces. They absolutely do.
One homeowner transformed a 40-square-foot powder room with turquoise fish scale mermaid tiles on one accent wall. Paired with white walls elsewhere and a floating white vanity, the space feels larger and more luxurious than its size suggests. The shimmer of the tiles catches light and creates depth.
Another successful small bathroom featured mermaid tiles only in the shower niche, creating a jewel-box effect. The concentrated use of premium tiles kept costs down while delivering maximum visual impact.
Luxury Master Bathroom Projects
High-end installations show what’s possible with generous budgets.
One stunning master bathroom featured floor-to-ceiling rose gold mermaid bathroom tiles in the entire shower enclosure, combined with Carrara marble on the floors and vanity. The contrast between the shimmering scales and the elegant marble created a truly resort-like space.
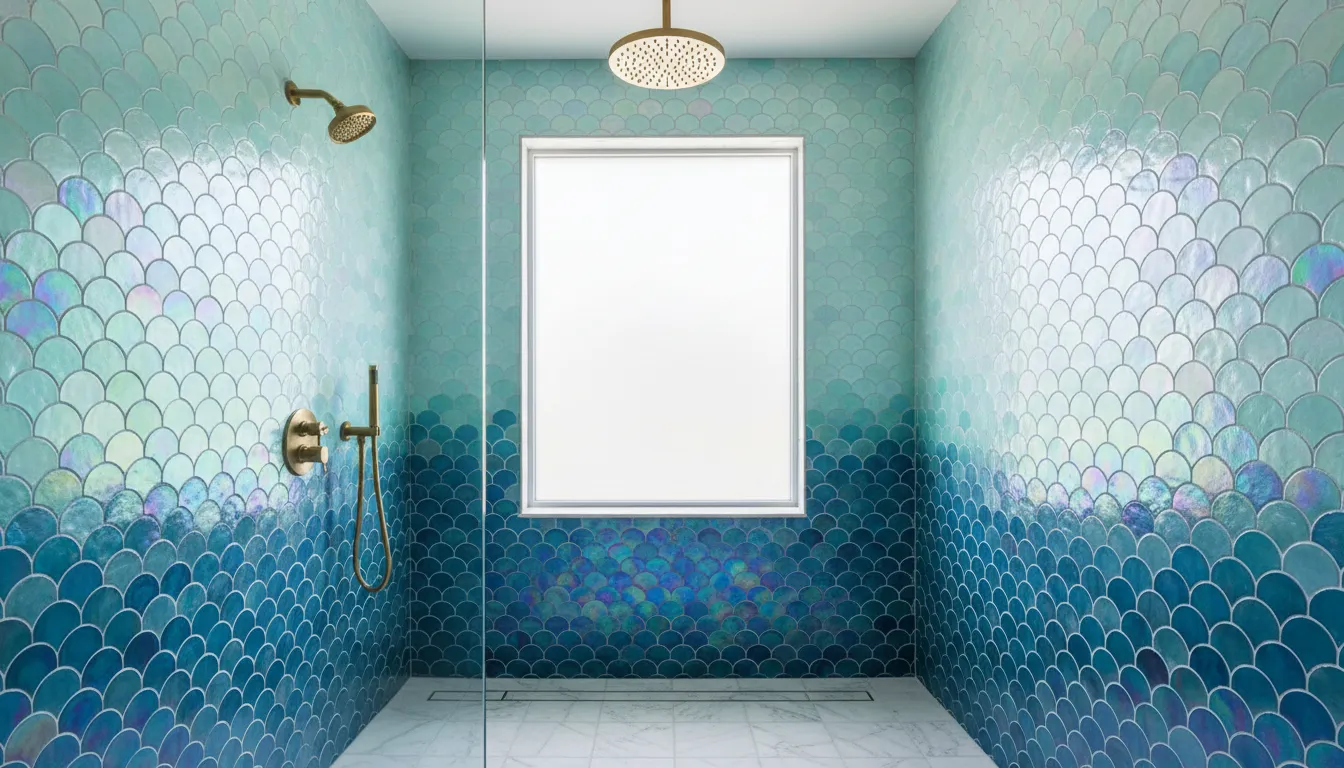
Another luxury project used gradient mermaid tiles transitioning from deep navy at the floor to pale aqua at the ceiling, mimicking the depth of ocean water. This installation required custom ordering tiles in multiple shades but created a genuinely unique space.
Budget-Friendly Makeovers
Inspiration comes at every price point. One clever DIYer created a mermaid tile bathroom on a $1,500 budget by using affordable ceramic fish scale tiles in just the shower, doing all installation work themselves, and shopping sales for fixtures.
Another budget-friendly approach used a single horizontal band of iridescent mermaid tiles around the room at chair rail height, with white subway tiles above and below. This strategic placement created the oceanic feel without the cost of tiling entire walls.
Where to Buy Mermaid Tiles and Finding Quality Suppliers
Now that you’re ready to buy, where should you look for mermaid tiles?
Online Retailers and Marketplaces
Wayfair and Overstock offer extensive selections of mermaid bathroom tiles at competitive prices. Their user reviews help you understand quality before buying. Shipping tiles requires careful packaging, so check return policies.
Tile specialty websites like TileBar and Fireclay Tile offer high-quality options including custom colors. While pricier, these suppliers often provide better customer service and product guarantees.
Etsy surprises people with unique handmade mermaid tiles from artisan tile makers. If you want truly one-of-a-kind tiles, this platform connects you with small producers creating distinctive designs.
Amazon carries basic mermaid tile options at rock-bottom prices, though quality varies significantly. Read reviews carefully and understand that super-cheap tiles may have inconsistent sizing or finish quality.
Local Tile Stores and Showrooms
Don’t overlook local options. Visiting tile showrooms lets you see and touch mermaid bathroom tiles before buying.
Home Depot and Lowe’s carry basic mermaid tile options at budget-friendly prices. While selection may be limited compared to specialty stores, you can take samples home and return products easily.
Independent tile stores in your area often carry higher-end options and can order specialty mermaid tiles from manufacturers. The staff typically has more expertise than big-box stores and can provide valuable installation advice.
Comparing Quality and Value
When evaluating mermaid tiles, consider these quality indicators:
Consistency in size and shape matters for proper installation. Better manufacturers maintain tighter tolerances, making installation easier and the finished product more professional-looking.
Finish quality shows in the details. High-quality mermaid bathroom tiles have even, consistent glazing without thin spots, drips, or color variations (unless intentional).
Water absorption rate indicates durability. Look for tiles rated for wet areas, especially for shower installations. This information should be in product specifications.
Don’t automatically choose the cheapest option. Mid-range mermaid tiles often provide the best value, offering good quality at reasonable prices. The least expensive tiles may cost more in the long run through installation challenges and premature replacement.
Frequently Asked Questions About Mermaid Tile Bathrooms
Let me address the questions I hear most often about mermaid tile bathrooms.
Are mermaid tiles suitable for shower floors?
It depends on the material. Porcelain fish scale mermaid tiles work on shower floors if they have a textured finish for slip resistance. Glass and glossy ceramic mermaid tiles are too slippery for floors. Always check the tile’s slip rating before using it on any floor surface.
How do I prevent my mermaid tiles from looking dated?
Choose classic color palettes rather than trendy ones. Blues, greens, and neutrals remain timeless. Avoid overly theme-heavy accessories. Your mermaid tiles can fit coastal, modern, or traditional styles depending on how you accessorize. Quality materials and classic designs ensure your mermaid tile bathroom looks good for decades.
Can I install mermaid tiles myself?
Yes, if you have basic DIY skills and tackle a manageable area. Small accent walls or backsplashes make excellent first projects. However, entire shower enclosures or complex layouts benefit from professional installation. Fish scale tiles require more precision than standard rectangular tiles, so be honest about your skill level.
What’s the best grout color for mermaid tiles?
This depends on your desired effect. Contrasting grout (like dark gray with light tiles) emphasizes the scale pattern and creates dramatic definition. Matching grout (like white with white tiles) creates a seamless, subtle look. For iridescent mermaid tiles, I typically recommend matching or light gray grout to let the tile shimmer be the focal point.
How long do mermaid tiles last?
With proper installation and maintenance, mermaid bathroom tiles last 50+ years. The tiles themselves are durable. The grout may need replacement after 10-15 years, but the tiles remain intact. This longevity makes mermaid tiles a worthwhile investment.
Conclusion: Creating Your Dream Mermaid Tile Bathroom
You’ve now got everything you need to create a stunning mermaid tile bathroom that transforms your space into an ocean-inspired sanctuary.
Whether you’re drawn to classic coastal vibes, glamorous luxury, or modern minimalism, mermaid tiles adapt beautifully to your vision. The shimmering scales, iridescent finishes, and organic patterns bring a unique magic that standard tiles simply can’t match.
Here’s what I want you to remember: Start with a clear plan. Choose quality mermaid bathroom tiles appropriate for your specific application. Don’t be afraid to mix expensive feature tiles with more affordable options to control costs. And whether you DIY or hire professionals, proper installation and waterproofing ensure your beautiful bathroom lasts for decades.
In my experience, the homeowners happiest with their mermaid tile bathrooms are those who let the tiles be the star. Keep other elements simple and let those gorgeous scales shine.
Your bathroom should be a retreat – a place where you start and end each day feeling refreshed. A well-designed mermaid tile bathroom delivers that feeling every single time you step through the door.
Ready to take the plunge? Start by sampling a few different mermaid tiles in your space. See how they look in your bathroom’s lighting at different times of day. Trust your instincts. When you find the right tiles, you’ll know.
Ready to transform your bathroom into an underwater oasis? Share your mermaid tile project plans in the comments below, or reach out if you have questions about your specific situation. I’d love to help you create the bathroom of your dreams!