Halloween Centerpiece Ideas: Creative Ways to Spook Up Your Table This Season
Introduction:
You know that feeling when you walk into a room and something just catches your eye? That’s exactly what a great Halloween centerpiece does. It’s not just decoration—it’s the conversation starter, the mood setter, the thing your guests will Instagram before they even sit down.
Here’s the thing: you don’t need to be a professional decorator or spend a fortune to create jaw-dropping Halloween table decorations. I’ve seen people stress over this every October, but honestly? Some of the best centerpieces I’ve come across used simple materials in clever ways.
In this guide, I’m going to walk you through everything you need to know about creating Halloween centerpiece ideas that’ll make your table the star of the season. Whether you’re hosting a sophisticated dinner party, a kid-friendly gathering, or something wickedly in between, you’ll find options that work for your style and budget.
Why Your Halloween Centerpiece Matters More Than You Think
Let’s talk about why this matters. Your centerpiece isn’t just filling space—it’s setting the entire tone for your event. Think about it: when guests sit down, what’s right at eye level? Your centerpiece. It’s their focal point for the entire meal.
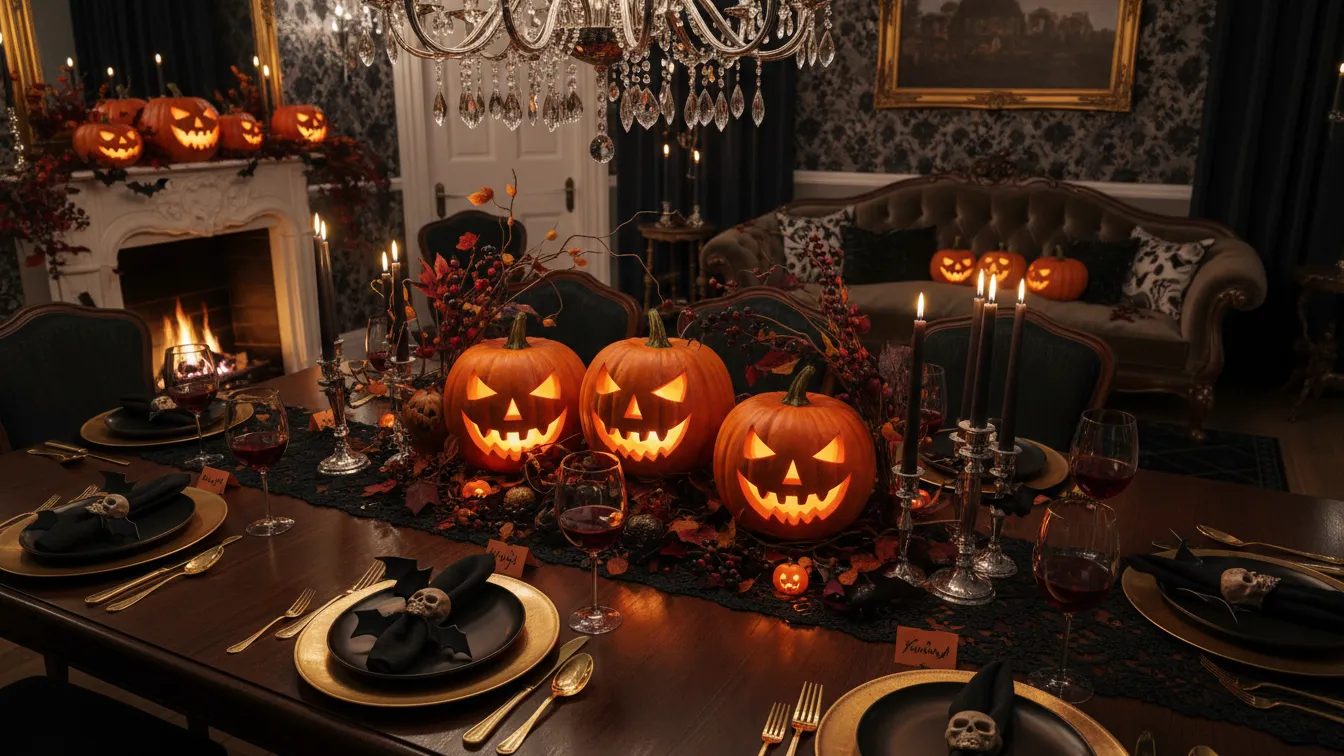
What I love about Halloween party centerpieces is how versatile they can be. You can go full-on spooky with cobwebs and skulls, or keep things elegant with black candles and autumn foliage. There’s no wrong answer here, just what feels right for your celebration.
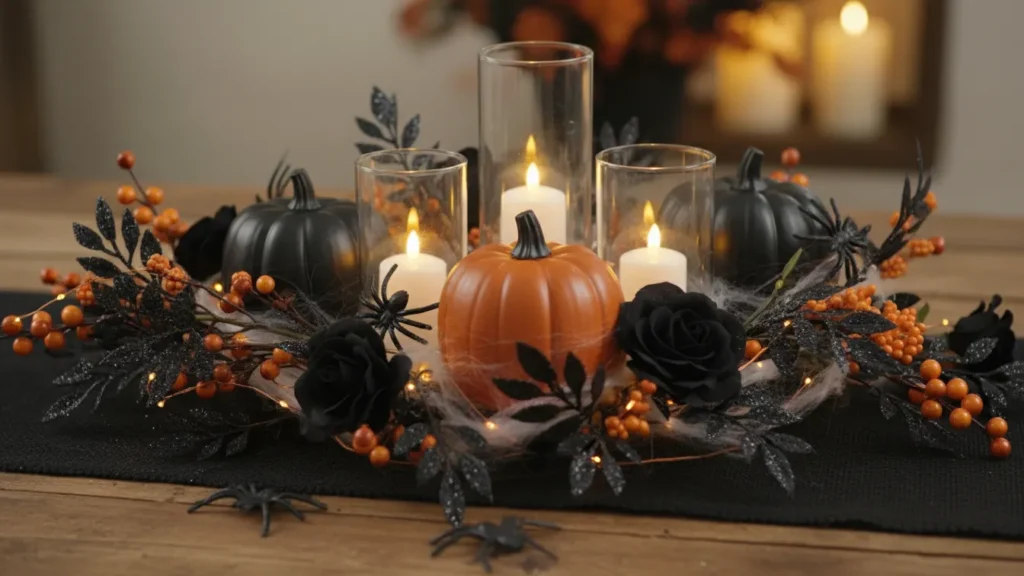
Classic Pumpkin Centerpiece Displays
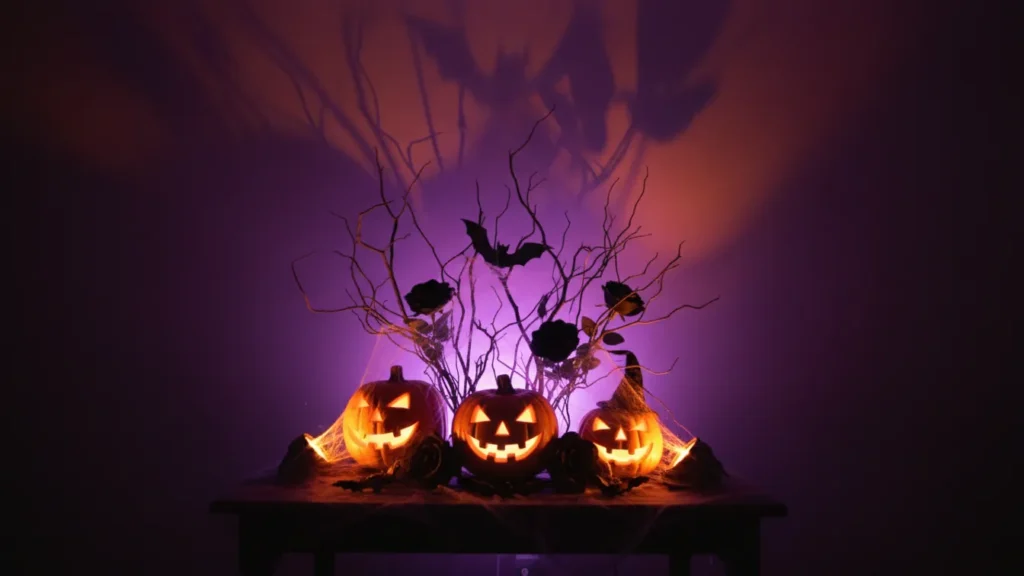
Traditional Carved Pumpkin Arrangements
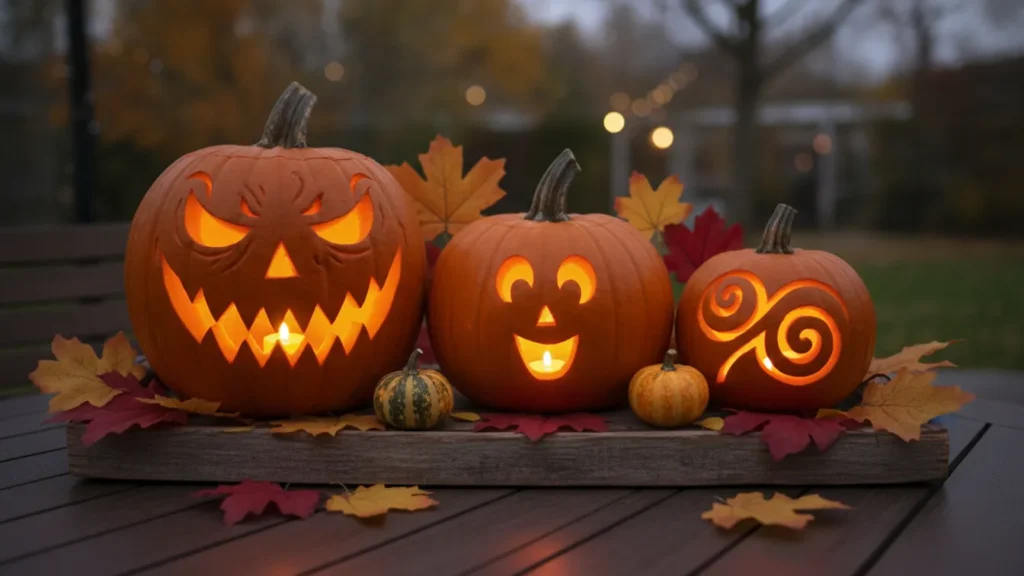
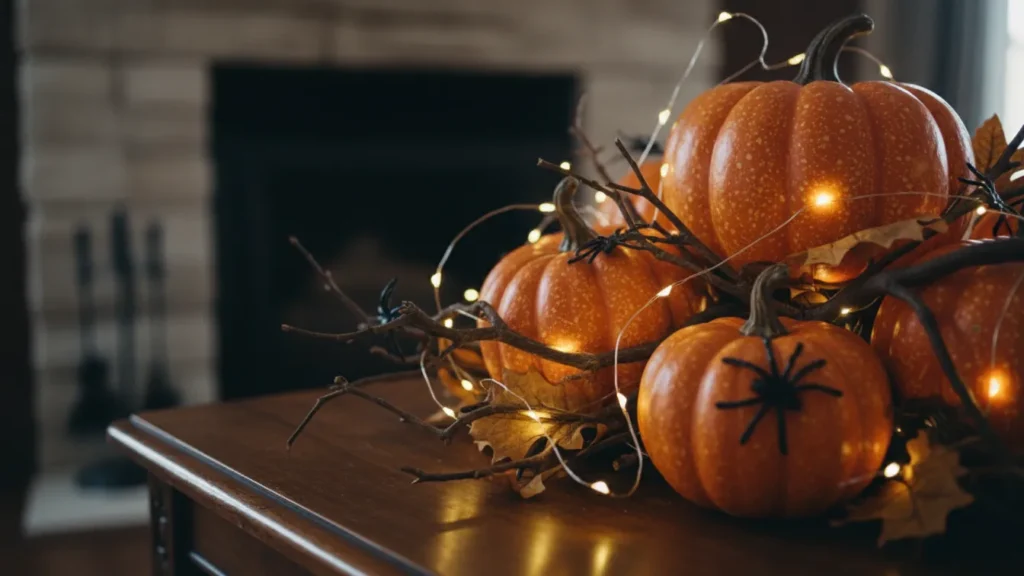
Now here’s where it gets interesting. Pumpkin centerpieces remain the quintessential Halloween decoration, and for good reason. They’re affordable, readily available, and incredibly versatile.
For a traditional approach, I recommend using three pumpkins of varying sizes. Place them on a rustic wooden tray or a decorative platter. Carve simple face designs or elegant patterns—you don’t need to create masterpieces here. The flickering candlelight from inside creates an enchanting glow that’s perfect for evening gatherings.
Step-by-Step Guide: Creating a Carved Pumpkin Centerpiece
- Select three pumpkins (small, medium, and large)
- Clean the exterior thoroughly with a damp cloth
- Cut circular openings at the top and remove seeds
- Sketch your design lightly with a marker
- Carve carefully using specialized pumpkin carving tools
- Place battery-operated LED tea lights inside for safety
- Arrange on your table with seasonal accents
Painted and Decorated Pumpkin Designs
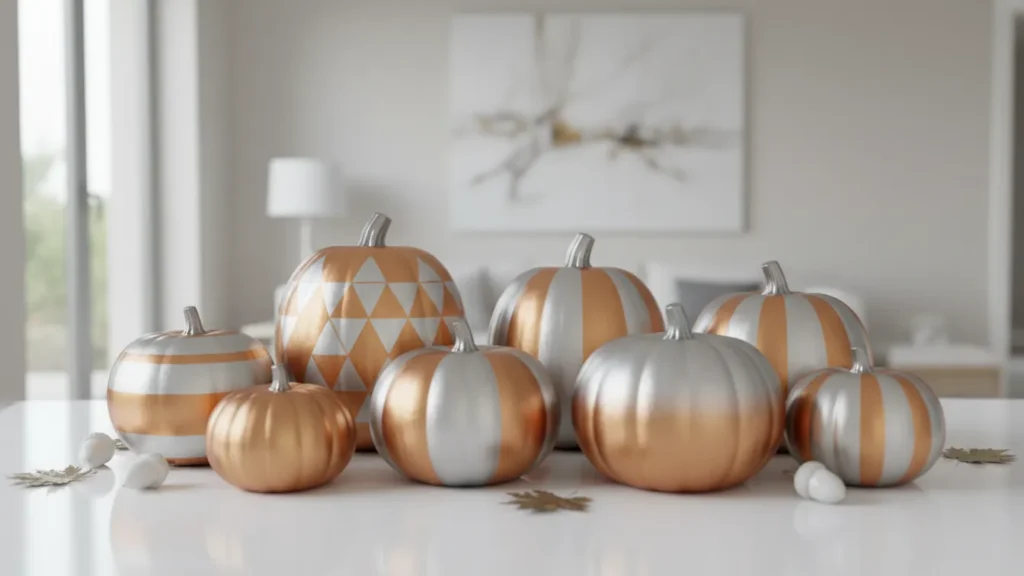
You might be wondering if carving is your only option. It’s not! Painted pumpkins offer a cleaner, longer-lasting alternative that works beautifully as DIY Halloween centerpieces.
In my experience, metallic paints create stunning effects. Try gold, copper, or silver spray paint for an upscale look. Or go bold with black and white patterns—stripes, polka dots, or geometric designs. These painted beauties won’t rot and can actually be reused next year.
For a truly unique approach, consider ombre effects using acrylic paints. Start with deep orange at the bottom and gradually blend to white at the top. It’s surprisingly easy and looks professionally done.
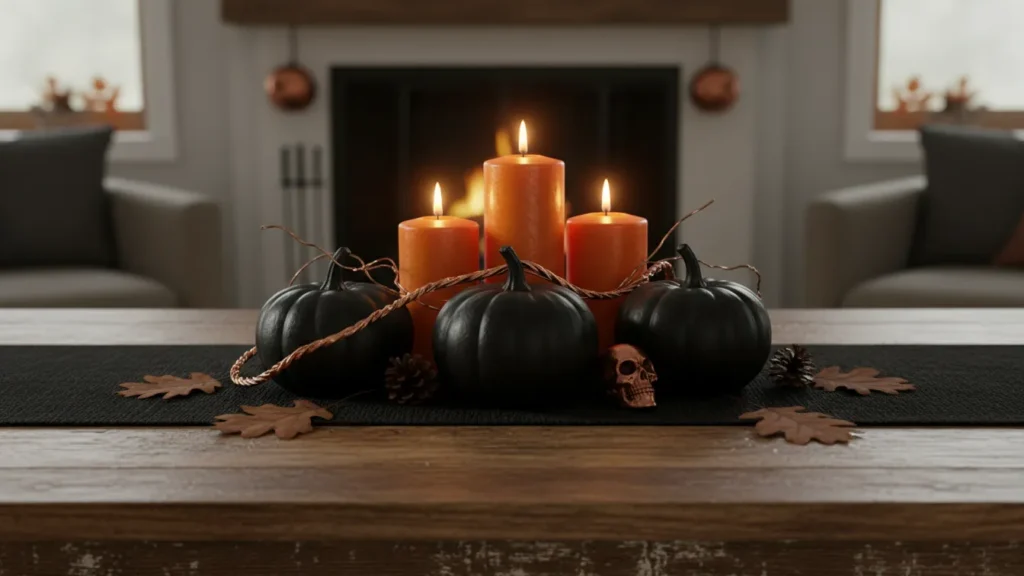
Spooky Candle Arrangements
Black Candle Centerpiece Ideas
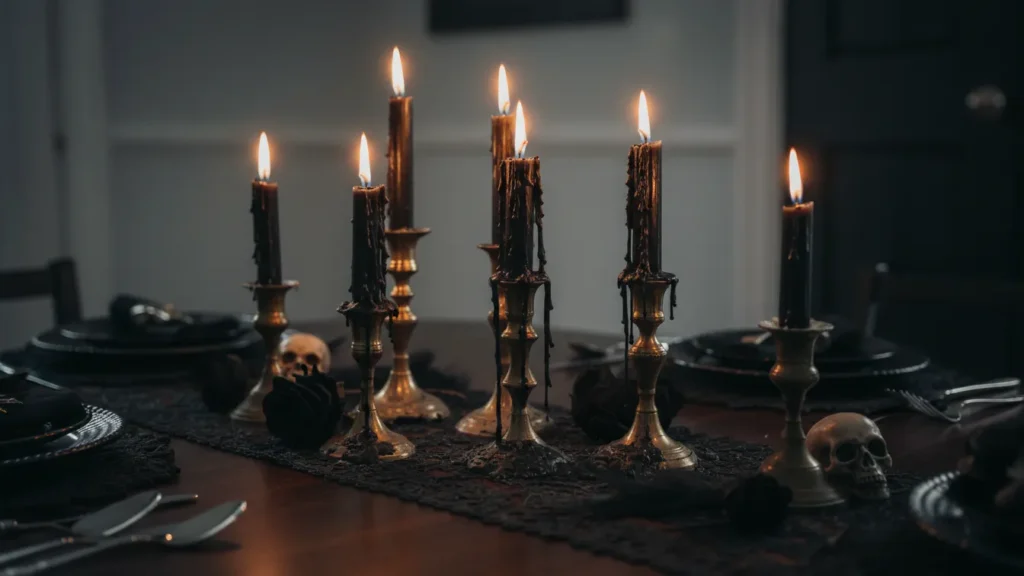
There’s something undeniably sophisticated about black candles as Halloween decorations. They’re moody, dramatic, and work for both casual and formal settings.
Group black taper candles of different heights in vintage candle holders for instant gothic elegance. Add dripping wax effects (you can buy them pre-made or create your own) for extra atmosphere. Place them on a black lace table runner with scattered autumn leaves underneath.
What I love about this approach is its versatility. During the day, it looks elegant and refined. Once you light those candles at night? Pure Halloween magic.
Floating Candle Displays in Water
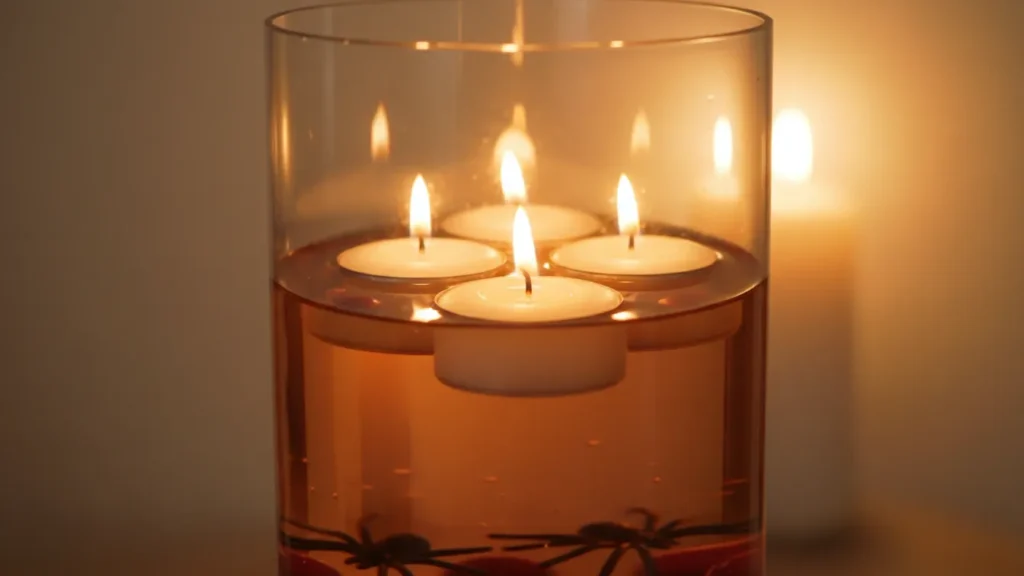
This is one of my favorite Halloween table centerpiece ideas because it’s both beautiful and unexpected. Fill a large glass bowl or cylinder vase with water, add floating candles, and watch the magic happen.
Here’s how to elevate this concept:
- Add orange or red food coloring for a eerie glow
- Float small plastic spiders or rubber eyeballs among the candles
- Use cranberries or small gourds at the bottom for color
- Include floating autumn leaves for seasonal charm
The gentle movement of water adds dimension that static centerpieces can’t match. Plus, it’s safe—no direct flame contact with other materials.
Natural and Rustic Halloween Centerpieces
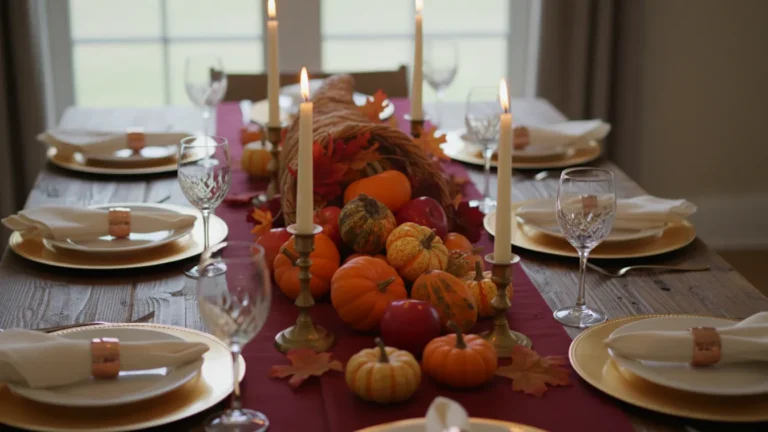
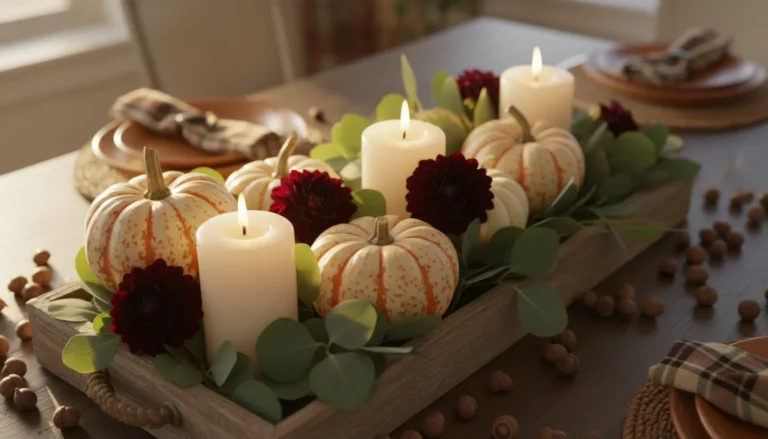
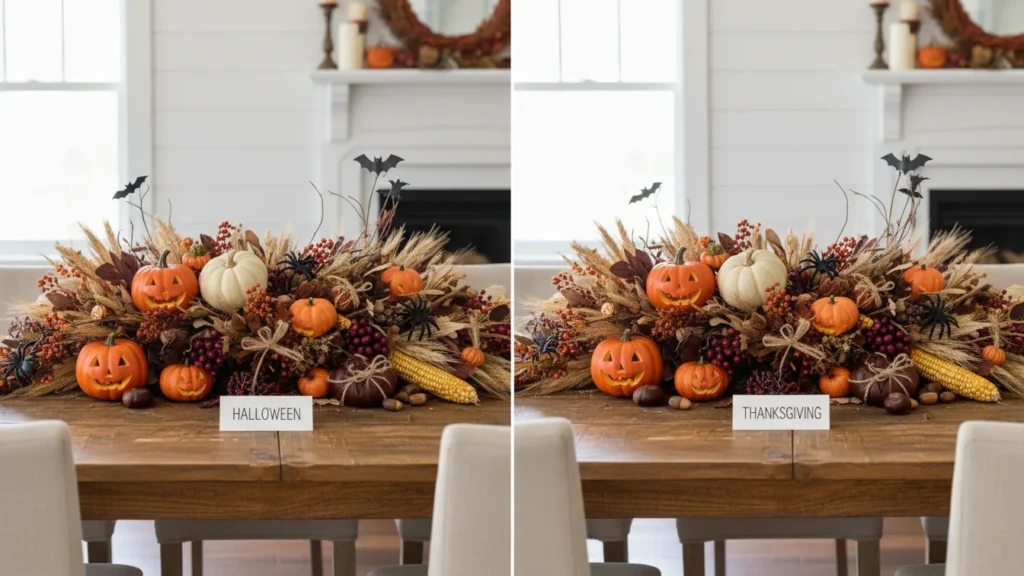
Autumn Harvest Themed Displays

Now here’s where it gets interesting for those who prefer subtle Halloween decor. Harvest centerpieces blend fall beauty with Halloween spirit seamlessly.
Start with a wooden bowl or woven basket as your base. Fill it with:
- Mini pumpkins and gourds in various colors
- Colorful fall leaves (real or high-quality artificial)
- Wheat stalks or dried corn
- Pine cones and acorns
- Seasonal flowers like mums and sunflowers
This approach works beautifully for Thanksgiving too, giving you more value from your effort. I’ve used the same base arrangement from October through November, just swapping out a few Halloween-specific elements.
Woodland and Branch Centerpieces
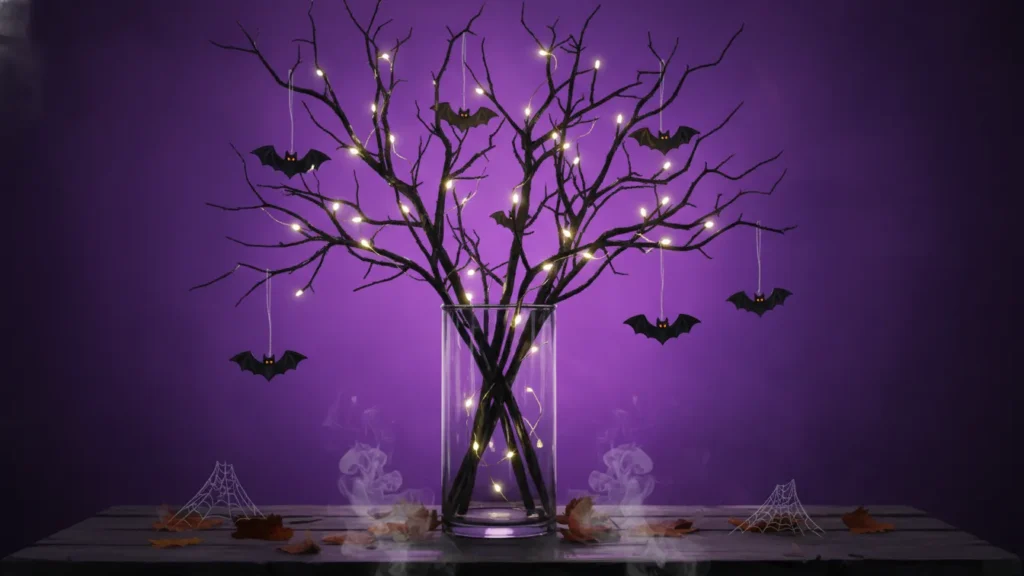
For a more dramatic natural look, consider creating twig and branch centerpieces. Spray paint bare branches black or white, then arrange them in a tall vase. Hang small decorations from the branches—plastic bats, paper ghosts, or miniature ornaments.
You can also create a “haunted forest” centerpiece using multiple branches of varying heights. Place LED string lights throughout for an ethereal glow. It’s like bringing a piece of the spooky woods right to your table.
Elegant and Sophisticated Halloween Centerpieces
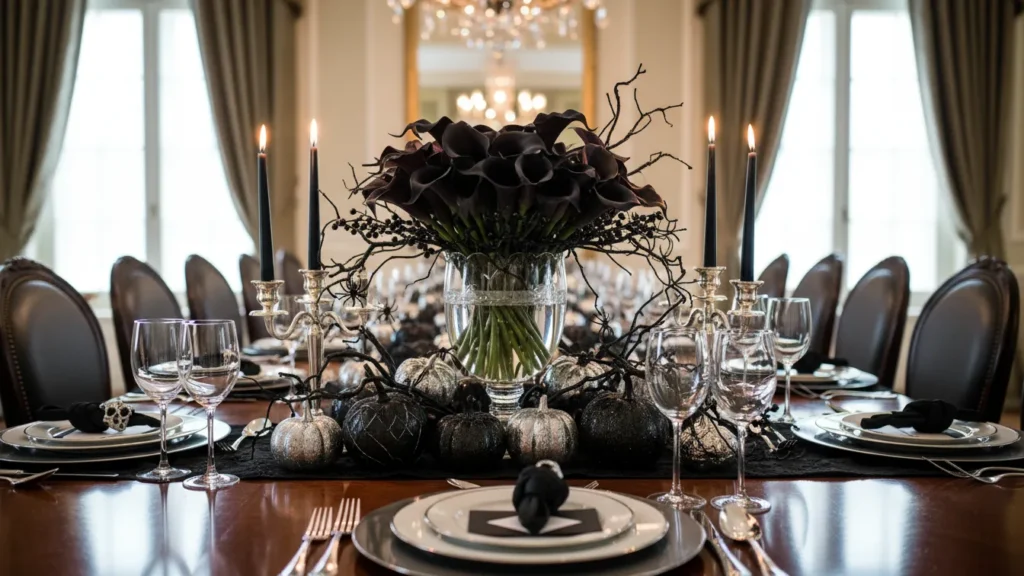
Gothic Romance Arrangements
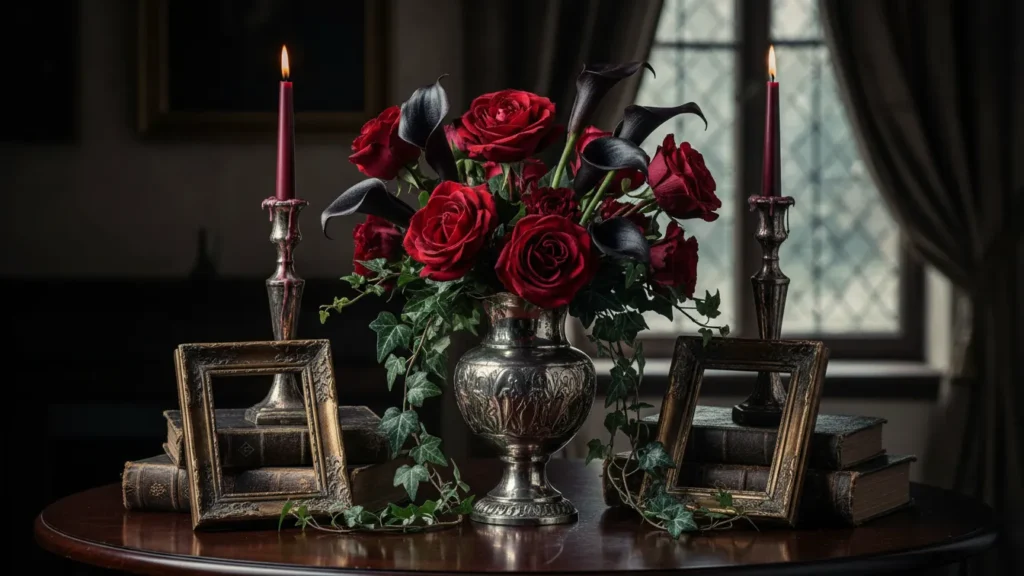
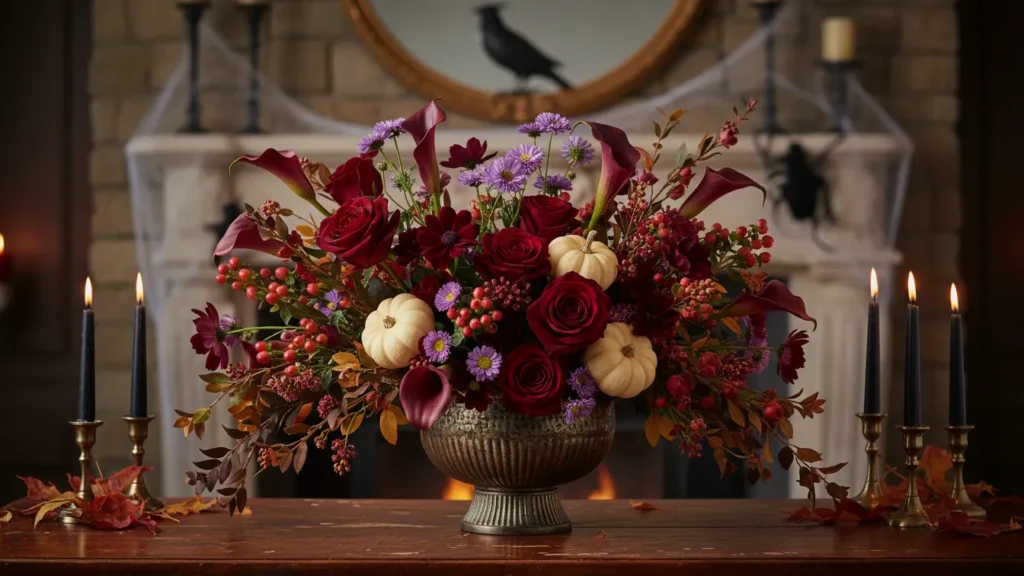
You don’t have to choose between elegant and Halloween-themed. Gothic centerpieces prove you can have both sophistication and seasonal spirit.
Combine deep red roses with black calla lilies in an ornate vase. Add trailing ivy for drama. Include vintage elements like antique candlesticks, old books, or Victorian-style picture frames. The key is creating layers—height variation keeps the eye moving.
For place settings, individual bud vases with single black flowers at each setting complement the main centerpiece beautifully. It’s cohesive without being repetitive.
Crystal and Candelabra Displays
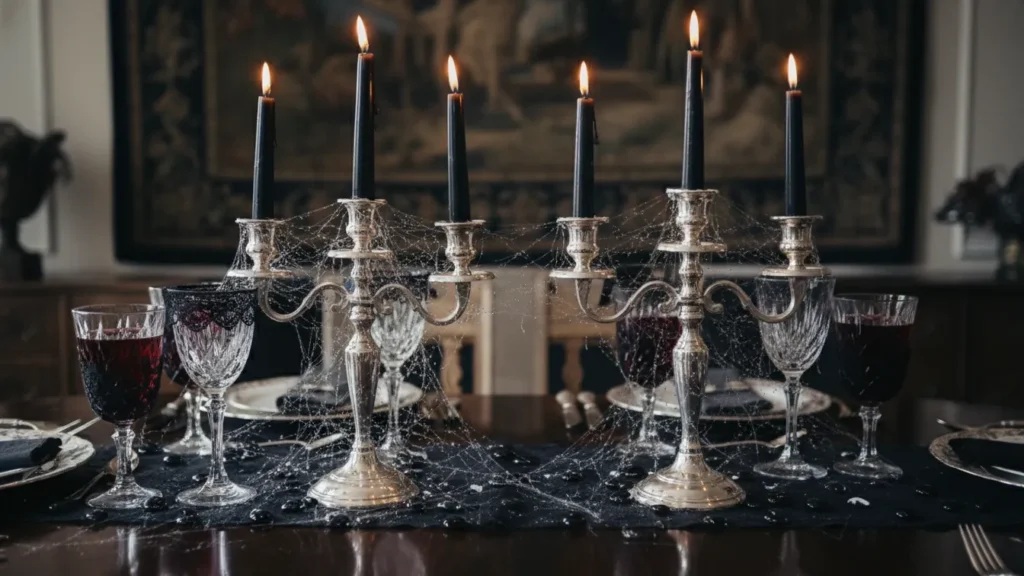
If you’re hosting a formal Halloween dinner, crystal and silver create stunning elegant Halloween centerpieces. Polish up that silver candelabra from storage and give it Halloween flair.
Drape faux cobwebs lightly over crystal pieces—just enough to suggest haunting without hiding the sparkle. Use black or deep purple taper candles. Scatter clear or black glass gems around the base. The contrast between refined materials and spooky elements creates unexpected visual interest.
DIY Halloween Centerpiece Projects
Mason Jar Centerpiece Ideas
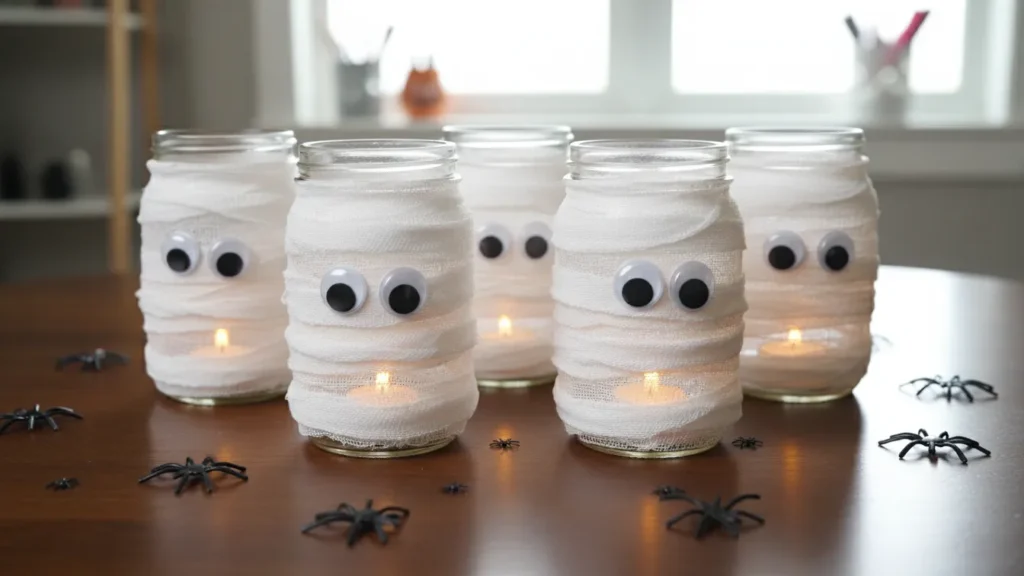
Let’s talk about mason jar Halloween centerpieces—they’re budget-friendly and endlessly customizable. I’ve probably made a dozen variations over the years, and they never disappoint.
Step-by-Step: Mummy Mason Jar Centerpiece
- Clean and dry your mason jars thoroughly
- Wrap white gauze or strips of white fabric around the jar
- Secure with hot glue at intervals
- Glue on googly eyes
- Place battery-operated tea lights inside
- Arrange in groups of 3-5 for maximum impact
You can also fill mason jars with layered candy corn, create terrariums with plastic spiders, or paint them in Halloween colors. The possibilities are genuinely endless.
Witch’s Cauldron Centerpieces
This is where you can really have fun. Small cauldron pots (you can find them at most craft stores) make fantastic Halloween centerpiece bowls.
Fill them with:
- Dry ice for a smoking effect (add just before guests arrive)
- Glow sticks and wrapped candy
- Faux spiders on “webs” of cotton batting
- Mini pumpkins and autumn florals
- LED lights buried under shredded black paper
The cauldron itself becomes a conversation piece, especially if you add handwritten “spell” labels or potion bottle decorations around it.
Creative Non-Traditional Halloween Centerpieces
Book Stack Centerpieces
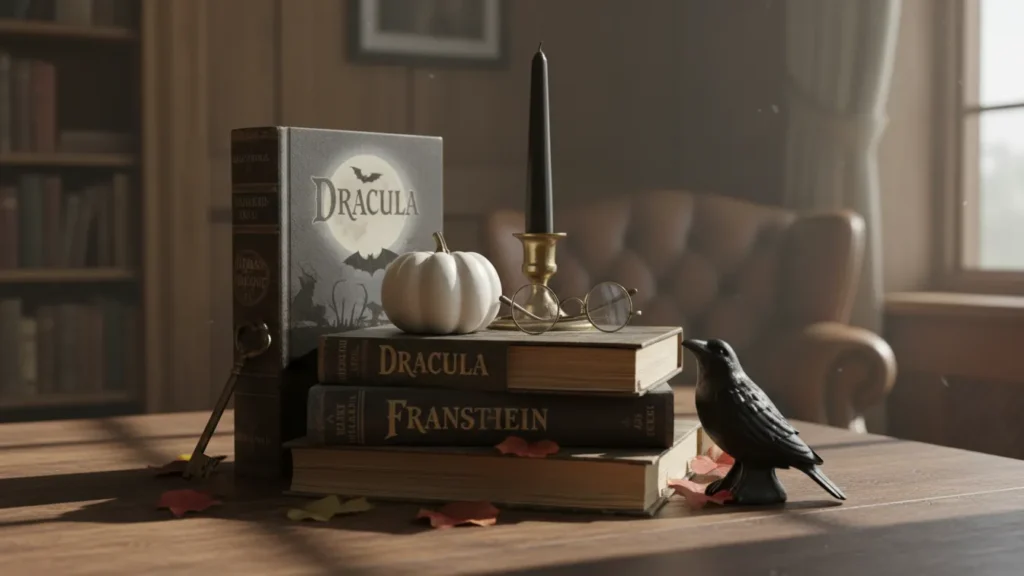
Now here’s an idea you might not have considered: literary Halloween centerpieces using stacked books. This works exceptionally well for themed parties or book club gatherings.
Stack 3-5 vintage or Halloween-themed books (think Edgar Allan Poe, Frankenstein, Dracula) and top with a small pumpkin or candle arrangement. You can find affordable vintage-looking books at thrift stores or print covers to wrap around books you already own.
Add a pair of reading glasses, an old-fashioned key, or a raven figurine to complete the scholarly spooky aesthetic. It’s sophisticated, thematic, and surprisingly simple.
Terrarium and Cloche Displays
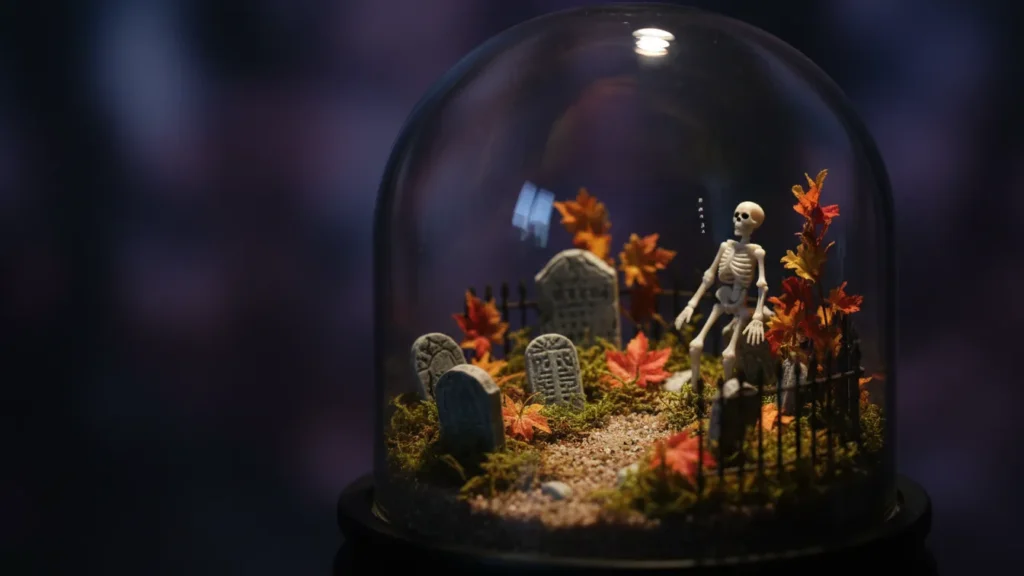
Glass terrariums and cloches create miniature Halloween worlds that captivate viewers. These glass dome centerpieces protect delicate arrangements while adding visual interest through the glass itself.
Create scenes inside:
- A miniature graveyard with tiny tombstones
- A haunted house model surrounded by moss
- Skeleton figurines in a bed of autumn leaves
- Taxidermy-style displays (faux, of course!) with plastic ravens
The enclosed nature makes these centerpieces easy to store and reuse year after year. I still have one I made five years ago that looks as good as new.
Kid-Friendly Halloween Centerpiece Ideas
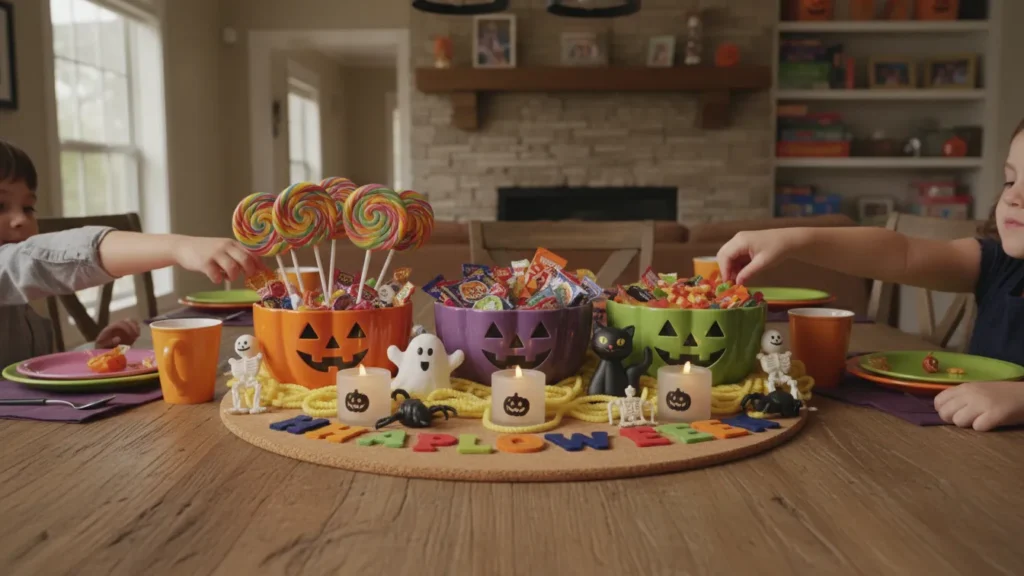
Candy-Filled Centerpieces
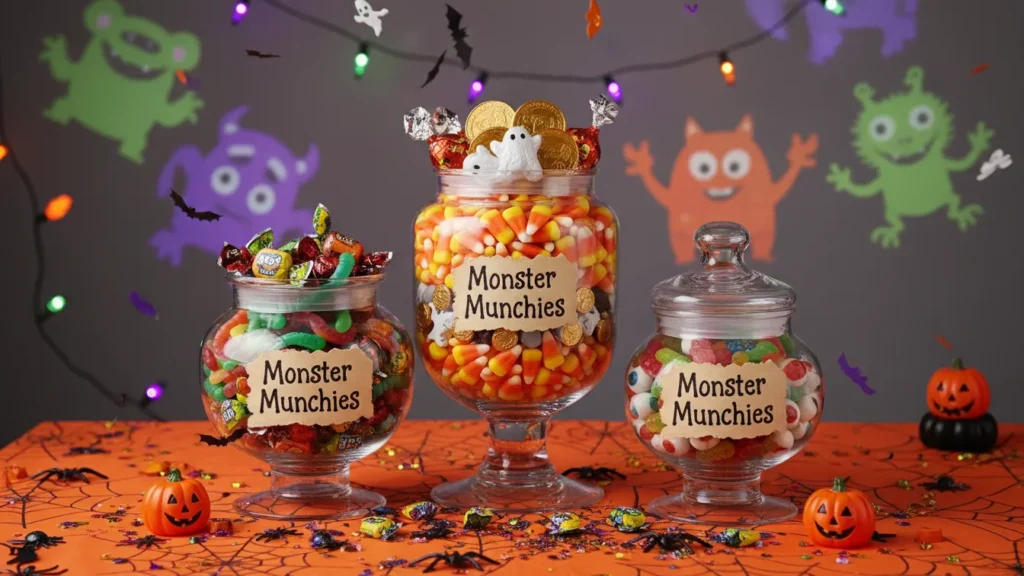
When little ones are at your table, candy centerpieces serve double duty as decoration and party favor. It’s practical and they’ll love it.
Use clear glass vases or apothecary jars and fill them with colorful Halloween candy—candy corn, wrapped chocolates, gummy worms. Layer different types for visual interest. Create labels like “Monster Munchies” or “Witch’s Treats” for added fun.
You might be wondering about the mess factor. Here’s my tip: if you’re worried about kids diving in mid-meal, use individually wrapped candies and make it clear these are for after dinner. Or create small individual candy cups at each place setting instead.
Silly Monster Centerpieces
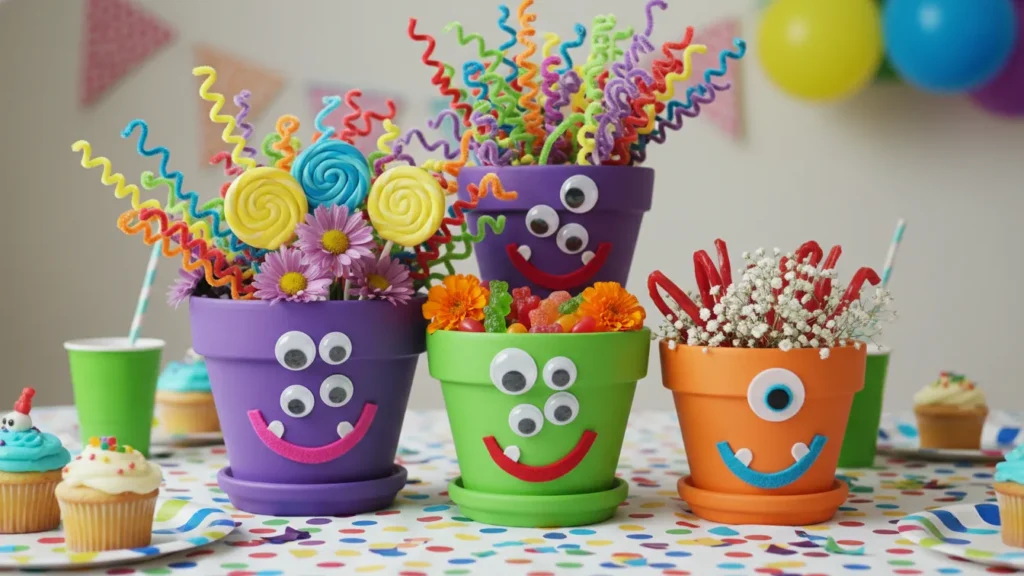
For younger children, cute beats scary every time. Monster centerpieces bring smiles instead of scares, which is exactly what you want for kids’ parties.
Easy Monster Centerpiece Tutorial:
- Get several small flower pots in various sizes
- Paint them in bright Halloween colors (purple, green, orange)
- Once dry, add googly eyes—lots of them!
- Create mouths with felt or foam sheets
- Add pipe cleaner “hair” for texture
- Fill with candy or small flowers
- Arrange as a “monster family” on the table
Kids absolutely love these, and they’re simple enough that children can help make them. It becomes a party activity and decoration all in one.
Themed Halloween Centerpiece Collections
Haunted Mansion Theme

For those going all-out with themed parties, haunted mansion centerpieces create a cohesive, immersive experience. Think Victorian elegance meets abandoned decay.
Elements to include:
- Antique-style picture frames (paint regular frames metallic and distress them)
- Vintage-looking clocks set to midnight
- Old keys and skeleton keys scattered artistically
- Dusty-looking candelabras with dripping candles
- Faded velvet fabric as a base
- Aged mirrors (use mirror spray paint on glass)
The trick is making everything look like it’s been sitting in an old house for decades. A light dusting of cobweb spray pulls it all together beautifully.
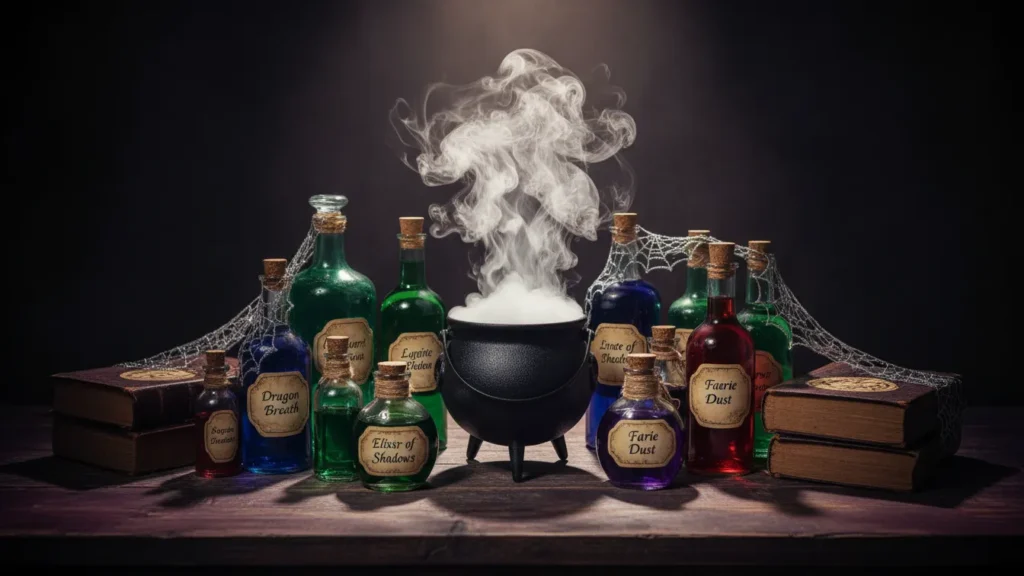
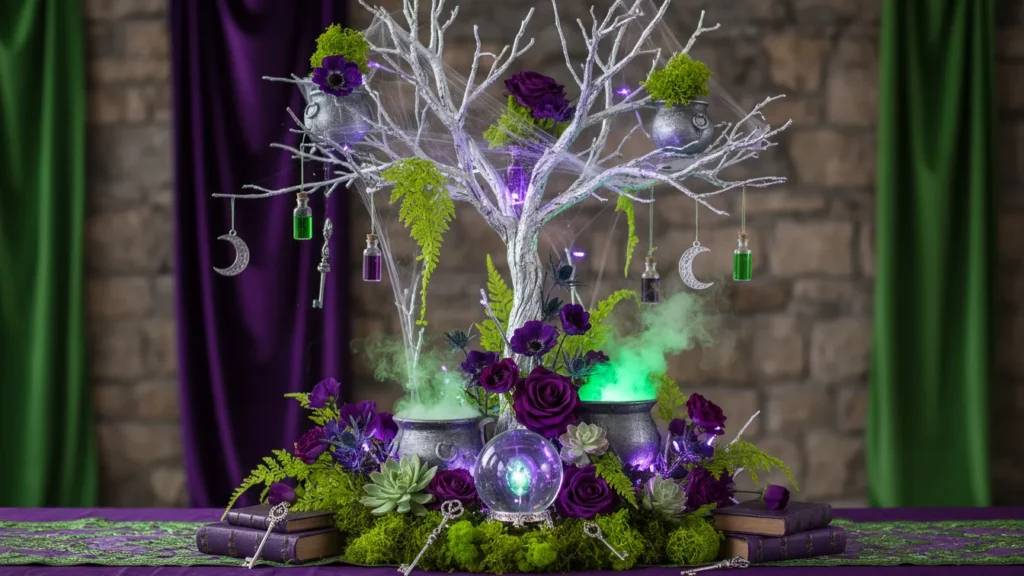
Witch’s Brew Theme
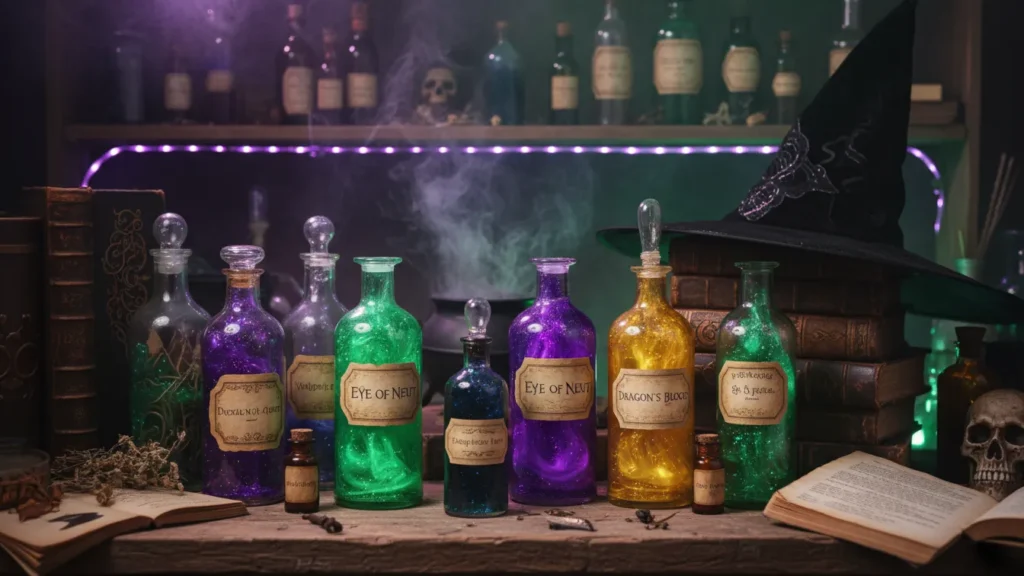
A witch theme centerpiece lets you get creative with potion bottles and mystical elements. This theme works great for both kids and adults depending on your execution.
Create a potion station centerpiece:
- Collect various glass bottles and vintage medicine bottles
- Fill with colored water and glitter
- Create aged paper labels: “Eye of Newt,” “Dragon’s Blood,” “Moonlight Essence”
- Arrange around a central cauldron
- Add spell books (DIY or purchased)
- Include a witch’s hat or miniature broomstick
For lighting, use green or purple LED lights underneath to make the “potions” glow. It creates an otherworldly effect that photographs beautifully.
Zombie Apocalypse Theme
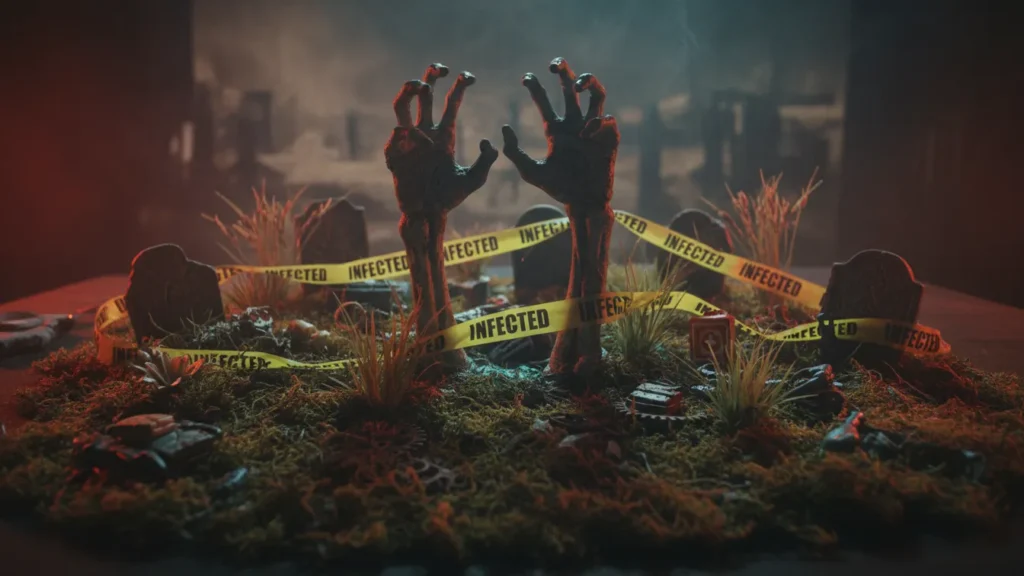
Now here’s where it gets fun for horror enthusiasts. Zombie centerpieces embrace the grotesque side of Halloween without being truly terrifying.
Think “overgrown graveyard” meets “abandoned civilization.” Use:
- Artificial grass or moss as a base
- Miniature tombstones
- Skeleton hands “emerging” from the table
- Distressed and “bloody” decorative elements
- Caution tape and warning signs
- Scattered “supplies” like flashlights and canned goods
You can even create small “survivor camp” scenes with miniature tents and supplies. It’s like creating a diorama that tells a story.
Budget-Friendly Halloween Centerpiece Ideas
Dollar Store Centerpiece Hacks
Let’s be real: not everyone wants to spend a fortune on decorations used once a year. Cheap Halloween centerpieces can look just as impressive as expensive ones with a little creativity.
Your dollar store is treasure trove for centerpiece materials:
- Plastic pumpkins (spray paint them for upgraded looks)
- LED tea lights and string lights
- Glass vases and containers
- Plastic spiders, bats, and skulls
- Fall floral picks and leaves
- Ribbon and fabric
I’ve created entire tablescape setups for under $20 using only dollar store finds. The secret? Stick to a cohesive color scheme and focus on layering different heights and textures.
Repurposed and Upcycled Centerpieces
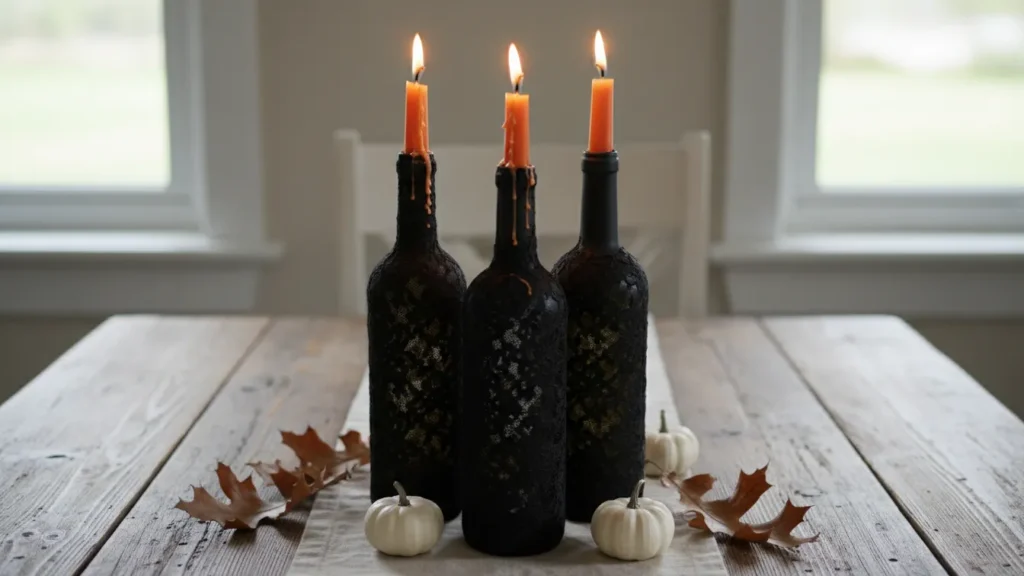
DIY budget centerpieces often come from things you already have at home. Look around—you might be surprised what you can transform.
Repurposing ideas:
- Old wine bottles painted black or wrapped in black lace
- Tin cans decorated as luminaries
- Cardboard boxes transformed into haunted houses
- Egg cartons turned into spider bodies
- Newspaper rolled into “logs” for a campfire display
- Glass jars from pasta sauce cleaned and decorated
The environmental bonus here is reducing waste while creating something unique. Plus, there’s something satisfying about transforming trash into treasure.
Choosing the Right Size and Scale
Small Table Centerpiece Guidelines
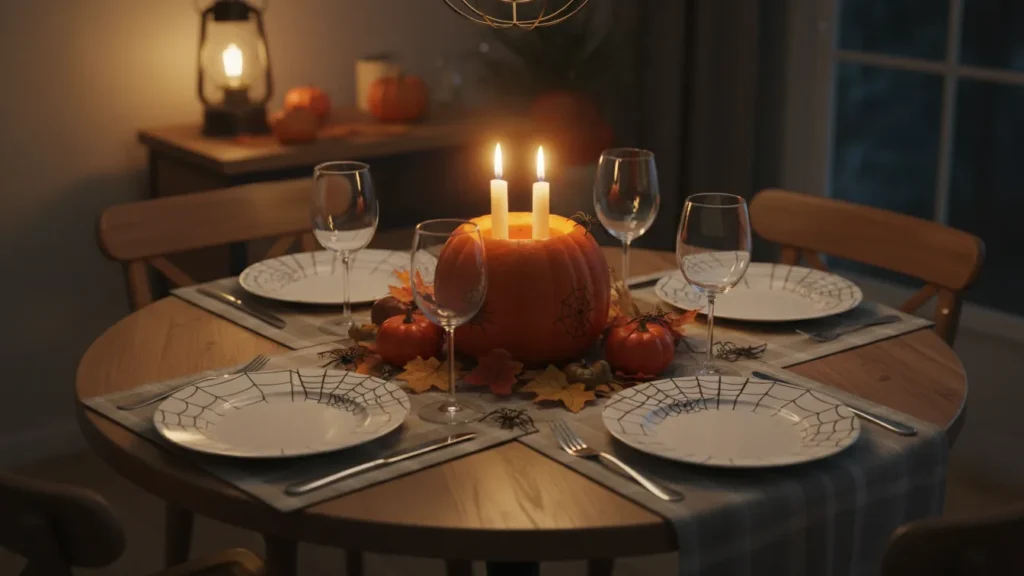
You might be wondering how to size your centerpiece appropriately. For small tables (seating 4-6 people), compact Halloween centerpieces work best.
Keep these measurements in mind:
- Height: No taller than 12 inches for easy conversation
- Width: Maximum 12-16 inches to leave room for plates
- Weight: Light enough that the table supports it easily
Single statement pieces work well—one medium pumpkin arrangement, one elegant candle grouping, one terrarium display. Don’t try to cram multiple elements onto a small surface.
Large Table Centerpiece Designs
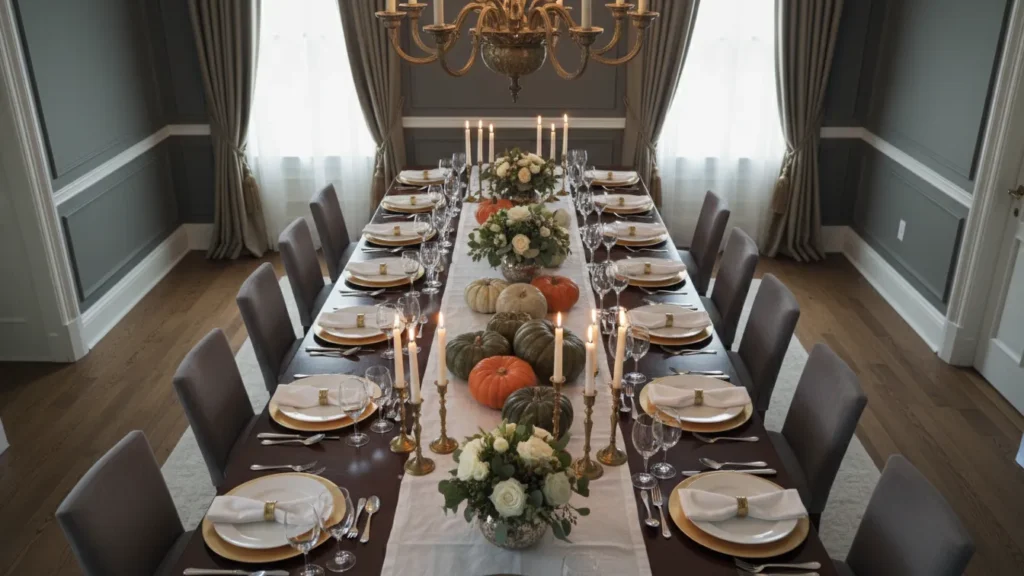
For dining tables seating 8 or more, you can go bigger and bolder with your large Halloween centerpieces. Here’s where you can really make a statement.
Consider a linear arrangement running the length of the table:
- Repeated elements (pumpkins, candles, or small arrangements) spaced evenly
- A garland base with accent pieces throughout
- Multiple coordinated centerpieces creating a cohesive look
The repetition creates rhythm and prevents any single area from feeling bare. Just maintain consistent spacing—usually 18-24 inches between elements looks most balanced.
Color Scheme Inspiration for Halloween Centerpieces
Traditional Orange and Black
You can’t go wrong with classic orange and black centerpieces. These colors are Halloween, no explanation needed.
But here’s the thing: even traditional doesn’t have to be boring. Mix textures and materials to add depth:
- Matte black pumpkins with glossy orange candles
- Orange flowers with black lace accents
- Black ceramic with orange LED lights
- Natural wood tones to warm up the palette
Add metallic copper or bronze to bridge the two colors beautifully. It adds sophistication while maintaining the classic feel.
Purple and Green Combinations
For a more whimsical or witchy vibe, purple and green centerpieces offer a fun alternative to traditional colors.
This combination works especially well for:
- Witch-themed parties
- Halloween events with a mystical focus
- Parties that blend Halloween and fall themes
Pair deep purple with lime green for drama, or use softer lavenders with sage greens for subtlety. Add metallic silver accents to make both colors pop.
Elegant Black and White
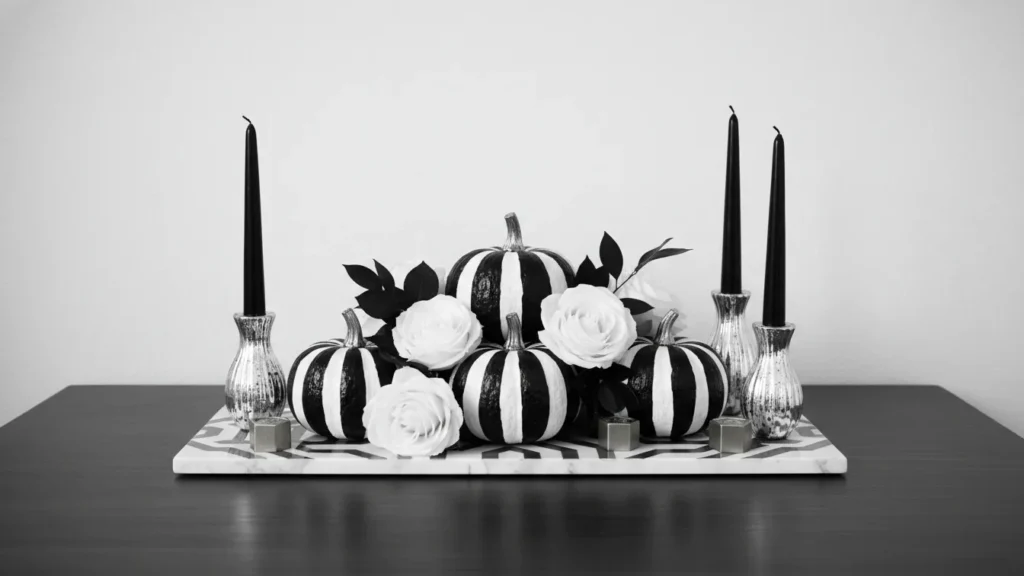
The most sophisticated option? Monochrome Halloween centerpieces in black and white. This approach feels modern and refined while still being seasonally appropriate.
Create drama through:
- Texture contrast (smooth glass vs. rough burlap)
- Pattern mixing (stripes, polka dots, geometric shapes)
- Material variety (ceramic, glass, metal, fabric)
- Height variation (tall candlesticks with low arrangements)
Add one metallic accent color—gold, silver, or copper—for just a hint of luxury. It elevates the entire look from stark to stunning.
Lighting Techniques for Halloween Centerpieces
Using LED Lights Safely
Let’s talk safety for a minute. LED centerpiece lighting has revolutionized Halloween decorating because it’s safe, long-lasting, and versatile.
Battery-operated LED lights eliminate fire hazards—crucial when you have fabric, paper, or other flammable materials in your centerpiece. They also don’t produce heat, so you can place them inside pumpkins, jars, or near delicate items without worry.
Options I recommend:
- Fairy string lights for magical twinkle effects
- Color-changing LED strips for customizable ambiance
- Remote-controlled options so you can adjust without disrupting the table
- Timer-equipped lights that turn on automatically
The best part? They last all evening without dimming or burning out.
Creating Atmospheric Glow Effects
Now here’s where it gets interesting. The right lighting transforms a good centerpiece into a memorable one. Ambient Halloween lighting is all about layers.
Try these techniques:
- Uplighting: Place small LED spotlights beneath transparent or translucent elements
- Backlighting: Position lights behind objects to create silhouettes
- Colored lighting: Use orange, purple, or green lights for instant atmosphere
- Flickering effects: LED candles with realistic flame simulation
For maximum impact, dim your overhead lights and let your centerpiece lighting take center stage. The dramatic shadows and glowing elements create that perfect Halloween ambiance.
Seasonal Transition Centerpieces
From Halloween to Thanksgiving
Here’s a practical tip: create transitional centerpieces that work for both holidays. It saves money and storage space.
Start with a neutral autumn base:
- Natural wood elements
- Fall foliage in traditional autumn colors
- Pumpkins and gourds in orange, cream, and brown
- Wheat stalks and dried corn
For Halloween, add:
- Black candles
- Plastic spiders or bats
- Dark purple accents
- Spooky signs or labels
Remove the Halloween-specific items after October 31st, and your centerpiece becomes perfect for November. Add a “Give Thanks” sign and maybe some seasonal flowers, and you’re set for Thanksgiving.
Early vs. Late Season Styling
The way you style Halloween centerpieces can shift throughout October. Early October can lean more harvest festival, while late October gets spookier.
Early October approach:
- Brighter colors (orange, yellow, burgundy)
- More natural elements
- Harvest-themed decorations
- Cheerful, welcoming vibes
Late October approach:
- Darker color schemes
- More overtly spooky elements
- Dramatic lighting
- Mysterious, eerie atmosphere
This progression keeps your decor feeling fresh throughout the entire season rather than becoming background noise.
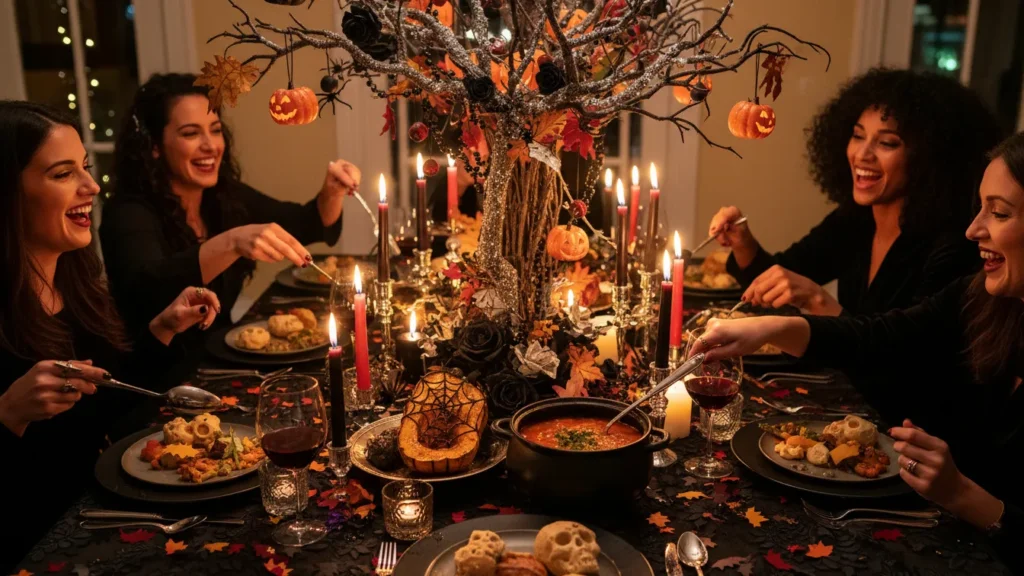
Centerpiece Ideas by Party Style
Formal Dinner Party Centerpieces
For elegant dinner party centerpieces, sophistication is key. You want impressive without being distracting.
Guidelines for formal settings:
- Keep height below 14 inches or above 30 inches (the “conversation zone” must stay clear)
- Use quality materials like crystal, silver, and fine ceramics
- Incorporate fresh flowers for elegance
- Maintain symmetry and balance
- Choose subtle Halloween elements over overt ones
Think black calla lilies in a silver vase rather than plastic skulls. Dark romantic over campy scary. Your guests should think “beautiful” before they think “Halloween.”
Casual Family Gathering Ideas
For family-friendly centerpieces, durability and fun trump formality. These displays need to withstand curious hands and still look good.
Choose:
- Sturdy containers that won’t tip easily
- Elements that aren’t fragile or particularly valuable
- Interactive components (candy to take, small toys to play with)
- Bright, cheerful decorations
- Kid-safe materials (no sharp edges or small swallowable pieces)
The centerpiece can be part of the entertainment. Create a display that invites interaction rather than one that must be avoided.
Kids’ Halloween Party Centerpieces
For children’s parties, kid’s Halloween centerpieces should be fun, colorful, and maybe even educational.
Make it interactive:
- Create a “guess the candy count” jar as the centerpiece
- Use craft projects the kids made as centerpiece elements
- Design a centerpiece that tells a story
- Include elements that light up or make sounds
- Use popular character themes (friendly monsters, superhero Halloween)
Remember: for young kids, cute beats creepy every single time. Save the truly spooky stuff for adult gatherings.
Incorporating Fresh Flowers
Halloween-Appropriate Floral Arrangements
Yes, fresh flower centerpieces absolutely work for Halloween! The key is choosing appropriate colors and varieties.
Best Halloween flowers:
- Deep burgundy or black calla lilies
- Dark red roses
- Purple statice or asters
- Orange marigolds or gerbera daisies
- Chocolate cosmos (they’re actually dark brown)
- Black magic roses
Pair flowers with seasonal elements like mini pumpkins, autumn leaves, or dark berries. The contrast between delicate blooms and Halloween motifs creates unexpected beauty.
Dried Flower and Preserved Options
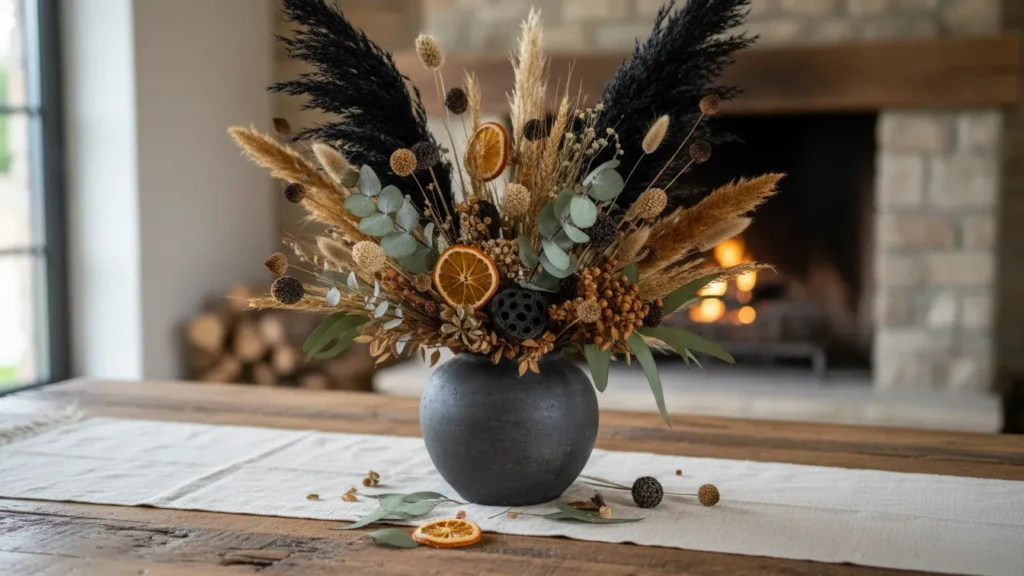
If you prefer something longer-lasting, dried flower centerpieces are perfect. They won’t wilt mid-party and can be prepared weeks in advance.
Dried elements to consider:
- Pampas grass (spray painted black for drama)
- Wheat stalks and dried grains
- Preserved eucalyptus
- Dried orange slices
- Preserved roses
- Seed pods and dried flowers from your garden
Arranged in a dark vase with some accent lighting, dried flowers create a beautiful, haunting aesthetic that’s perfect for the season.
Storage and Reusability Tips

Protecting Your Investment
You’ve put time and effort (maybe money too) into creating beautiful centerpieces. Let’s talk about making them last with proper centerpiece storage.
Storage tips:
- Photograph your arrangements before disassembling (helpful for reconstruction next year)
- Store delicate items wrapped in tissue paper or bubble wrap
- Use clear bins so you can see contents without opening
- Label everything clearly with contents and year created
- Keep like items together (all candles, all pumpkins, etc.)
- Store in climate-controlled spaces when possible
I learned this lesson the hard way when mice got into my garage storage and ruined several beautiful pieces. Now everything Halloween goes in sealed bins in the house.
Multi-Year Centerpiece Planning

Think about creating reusable Halloween centerpieces that you can refresh each year with minor updates.
Invest in quality base pieces:
- Substantial vases and containers
- Well-made artificial elements (realistic pumpkins, quality branches)
- Durable candle holders
- Versatile decorative items
Each year, add a few new inexpensive elements while keeping your quality bases. It’s like updating your wardrobe with accessories—small changes create a fresh look without starting from scratch.
Common Centerpiece Mistakes to Avoid
Sizing and Proportion Errors
Let’s talk about what doesn’t work. The most common centerpiece mistakes relate to size and scale.
What to avoid:
- Centerpieces so tall guests can’t see each other
- Arrangements so wide there’s no room for plates
- Multiple clashing styles fighting for attention
- Overcrowding—sometimes less is more
- Decorations that block serving dishes or reach across the table
If your guests have to move the centerpiece to eat comfortably, it’s too large. Period. The centerpiece should enhance the dining experience, not hinder it.
Safety Considerations
Safety isn’t exciting, but it’s essential for safe Halloween centerpieces. Here’s what needs attention:
Check for these hazards:
- Open flames near flammable materials
- Heavy items that could tip over
- Sharp edges or points at eye level
- Small pieces that could be choking hazards for young children
- Electrical cords creating trip hazards
- Allergenic materials (some people are sensitive to certain flowers or scents)
When in doubt, swap real candles for LED alternatives. The slight loss in authenticity is worth the peace of mind.
Comparing Different Centerpiece Styles
Let me break down the pros and cons of different approaches to help you choose what’s right for you.
| Centerpiece Style | Cost | Time to Create | Durability | Best For |
|---|---|---|---|---|
| Fresh Flower Arrangements | $$-$$$ | 30-60 minutes | 3-7 days | Elegant dinner parties, special occasions |
| Carved Pumpkins | $ | 1-2 hours | 5-10 days | Traditional celebrations, all skill levels |
| Painted Pumpkins | $ | 2-3 hours | All season + reusable | Modern themes, long-term display |
| Candle Groupings | $-$$ | 15-30 minutes | Reusable | Romantic ambiance, adult gatherings |
| DIY Mason Jar Projects | $ | 1-2 hours | Reusable | Budget-conscious, craft enthusiasts |
| Natural/Harvest Style | $ | 30-45 minutes | 2-4 weeks | Versatile, family-friendly |
| Gothic Elegant | $$-$$$ | 1-2 hours | Reusable | Formal events, sophisticated themes |
| Kid-Friendly Candy | $-$$ | 20-40 minutes | Single use | Children’s parties, casual gatherings |
This comparison shows there’s truly an option for every budget, skill level, and event type. You don’t need expensive materials to create something memorable.
Expert Tips for Picture-Perfect Centerpieces
Styling for Social Media
Let’s be honest: if it’s not Instagram-worthy, did it even happen? Photogenic centerpieces require some specific considerations.
For the best photos:
- Create depth by layering different heights
- Use odd numbers of elements (3, 5, 7 look more natural)
- Add lighting specifically for photos (ring lights work great)
- Consider how it looks from multiple angles
- Include one focal point that draws the eye
- Use contrasting colors for visual impact
Natural lighting photographs best, so if you’re shooting during the day, position near windows. For evening shots, warm LED lights create a cozy, inviting glow.
Professional Decorator Secrets
What I love about learning from professionals is discovering the tricks that make everything easier. Here are some professional centerpiece techniques I’ve picked up:
Insider tips:
- Use floral foam for stability in arrangements (soak it first for fresh flowers)
- Hot glue is your friend—it holds almost anything temporarily
- Layer textures (smooth with rough, shiny with matte) for interest
- Create asymmetrical balance rather than perfect symmetry
- Use the “rule of thirds” from photography
- Add one unexpected element for memorability
Professional decorators also prep early. Most of your centerpiece can be assembled 1-2 days before your event, with only final touches (lighting candles, adding fresh flowers) done the day of.
Frequently Overlooked Details
Scent Considerations
Here’s something people don’t think about enough: smell. Scented centerpieces can enhance ambiance or completely ruin it, depending on execution.
What works:
- Subtle cinnamon or apple scents (fall classics)
- Light pine or evergreen scents
- Unscented options (safest for dinner tables)
- Scented candles placed away from food
What doesn’t:
- Strong floral perfumes competing with food aromas
- Multiple competing scents
- Anything overpowering or artificial-smelling
Your nose adjusts to scents quickly, so what seems subtle to you might be overwhelming to guests. When in doubt, skip scent on dining centerpieces and save it for side tables or entryways.
Texture and Dimension
Flat centerpieces look flat. Literally. Adding dimension to centerpieces makes them significantly more visually interesting.
Create layers:
- Stack books or boxes as risers under fabric
- Use varying container heights
- Include both vertical and horizontal elements
- Add draping fabric or materials that cascade
- Incorporate items with different surface textures
Think about how your eye moves through the arrangement. It should travel up, down, and around—not just across. Movement creates engagement.
Creating a Cohesive Halloween Table Setting
Matching Centerpiece to Overall Decor
Your centerpiece doesn’t exist in isolation. It’s part of your entire Halloween table design, and everything should work together harmoniously.
Consider coordination with:
- Table linens (color, pattern, texture)
- Dinnerware and serving pieces
- Place settings and napkins
- Wall decorations in the dining area
- Lighting throughout the space
You don’t need everything to match exactly—that’s boring. Instead, carry through 2-3 main colors or themes. If your centerpiece is gothic and elegant, your place cards should follow suit, not be cutesy cartoon ghosts.
Complementary Table Elements
Think about the supporting cast for your centerpiece star. Coordinating table decorations complete the picture.
Additional elements:
- Placemats or chargers in complementary colors
- Napkin rings with Halloween motifs
- Individual place card holders
- Small accent decorations between place settings
- Coordinated serving pieces
- Thematic glasses
These small touches tie everything together without competing with your centerpiece. They’re the backup singers that make the lead vocalist sound even better.
The Final Touch: Bringing It All Together
Here’s what I want you to remember: the perfect Halloween centerpiece isn’t about following rules—it’s about creating something that makes you happy and fits your celebration.
Start simple if you’re new to this. Pick one style that appeals to you from this guide and execute it well. Don’ttry to combine every technique in one display. Master the basics, then experiment as you gain confidence.
Think about what story you want to tell. Are you creating elegant gothic romance? Playful family fun? Harvest celebration with a Halloween twist? Let that vision guide your choices.
And please, give yourself permission to have fun with this. Some of the best centerpieces I’ve seen came from people who stopped worrying about “doing it right” and started enjoying the creative process.
Ready to Create Your Halloween Masterpiece?
You now have everything you need to create stunning Halloween table centerpieces that’ll impress your guests and maybe even yourself. From traditional carved pumpkins to elegant candelabras, budget-friendly DIY projects to sophisticated floral arrangements—the perfect centerpiece for your celebration is within reach.
Start planning now, even if Halloween seems far away. The best decorators begin early, gathering materials over time and refining their vision. Take photos of inspiration you find. Collect items when you spot them on sale. Test your ideas before the big day.
What centerpiece style are you going to try first? Will you go classic with pumpkins, elegant with black candles, or maybe create something completely unique? Whatever you choose, make it yours.
Now it’s your turn. Grab some supplies, clear your table, and start creating. Your perfect Halloween centerpiece is waiting to be made. And when you’re done, I hope you’ll sit back, light those candles, and admire what you’ve created.
Happy haunting, and happy decorating!